FreeBSD + Freeradius2 + EAP-TLS + ssl-admin, a WPA2 Enterprise Guide.
Table of contents
- Background
- What is this post about?
- What is Extensible Authentication Protocol – Transport Layer Security?
- What is a X.509 certificate?
- Why go through all this trouble?
- What Is Needed
- Downsides to EAP-TLS
-
How to
- Installing FreeBSD
- Installing FreeRADIUS2
-
Creating the X.509 Self -Signed Certificates
- Install ssl-admin
- Configure
- Copy defaults
- Create self signed CA
- Next create server certificate
- Create OSX client certificate
- Create Android client certificate
- Create the Diffie Hellman file
- Configure FreeRADIUS to use self-signed certificates
- Cleaning up the permissions and files:
- Configuring the Access Point
- Check FreeRADIUS configs
- Configuring an OS X client
- Configuring an Android client
- TLDR
- Where to go from here
- Sources
- Versions used
Background
For years I’ve wanted to implement WPA2 Enterprise security for my home wireless network. For years I made slipshod attempts to do so, something typically would go wrong with the configuration/install and I never could source down what I broke or what was not working. Two months ago I decided I was going to make a full bore attempt. I finally found the right combination of software and configuration to get this running. I have also found several great blog posts describing the methods they used to get EAP-TLS working and roughly the commands used to get there. I have had a similar experience but not exact as others, which is why I’m writing this guide; to add to the collective knowledge/experience of this process using FOSS.
I’d also like to preface this by saying this post reflects my current understanding of the subjects below which mostly correlates with fact but are subject to error.
What is this post about?
This guide is written to help implement WPA2 Enterprise over a wireless network using only the most secure EAP protocol (EAP-TLS) for authentication. This is accomplished by using FreeBSD as a RADIUS server for 802.1X utilizing only EAP-TLS for verification. This guide doesn’t go into depth on how to secure and harden the FreeBSD machine much further, just enough to get freeradius2 using self-signed X.509 certificates configured and running.
This guide will also briefly touch on the wireless Access Point (AP) setup as an Authenticator and client (aka Supplicant in 802.1X terminology) setup on Apple OS X and Android.
What is Extensible Authentication Protocol – Transport Layer Security?
EAP-TLS is a method of authentication where both sides verify each other’s identities through X.509 certificates; password are only used to securely store the private certificate keys on disk and not used directly between the Supplicant and Authentication Server. EAP-TLS is used to authenticate for 802.1X to grant or deny access to a network, such is the case here on a wireless network. 802.1X can also restrict access to a wired LAN but isn’t discuss in this guide beyond this sentence.
In the case of WPA2 PSK (Pre-Shared-Key) aka WPA2 Personal, the access point (AP) asks the wireless client for identification in the form of a password. The conversation goes something like:
The Naive Client: “I’m looking for ‘_YourHomeWiFiSSID‘ is that access point in range?_“
The Incorrect Home AP: “I’m ‘_YourHomeWiFiSSID‘_“
The Naive Client: “Cool, I’d like to connect. Here is the Pairwise Transient Key.“
The Incorrect Home AP: “Sorry, I get a different hash. You must think I’m a different AP with the same name.“
What is concerning about this, is the Pairwise Transient Key (PTK), which is the session key, contains the hashes of the AP SSID, password, two sets of random numbers, and the MAC addresses of the client and AP. After collecting enough PTKs you can derive the Pairwise Master Key (PMK) from deducing the portion that contains the MAC addresses and random numbers. From there it is a simple matter of brute-forcing aka computational guessing to discover the pre-shared key aka the plain text password.
There are many ways to obtain the clear text password from the Pairwise Master Key. The PMK can be brute forced with a dictionary attack, or cracked against a rainbow table, or uploaded to the cloud to be cracked using a pay-for-use-password-cracking-cloud-service. There are some hacking techniques used to utilize functions built into the 802.11 standard to harvest more Pairwise Transient Keys quicker than can be done naturally by just listening to a Wifi conversation. Such techniques inject a DEAUTHENTICATION packet into the stream which is a legitimate 802.11 command, but intended when a client is closing the connection. At this point a different Pairwise Transient Key will be transmitted on reconnect. This reconnection will enviably happen because the actual client did not want to end the connection, a malicious person poising as the client sent that packet. Here is a good explanation of the WPA2-PSK opening transaction.
With EAP-TLS the conversation is different, both sides verify each others identification in the form of certificates that use asymmetric encryption to pass data to each other. The EAP-TLS conversation with goes something like this:
The Suspicious Client: “I’m looking for ‘_YourHomeWiFiSSID‘”_
The Frank AP: “I’m ‘_YourHomeWiFiSSID‘_“
The Suspicious Client: “I’d like you to prove it. Tell Strict Barney the Authentication Server that Suspicious_Client wants to connect using EAP-TLS.“
Strick Barney The Authentication Server: “Here’s my server certificate. It’s signed by our Certificate Authority (CA). Send all future messages encrypted with my public key that’s attached.“
The Suspicious Client: <
Encrypted with Barney's public key“I see your server certificate is signed by our CA. I trust our CA. M__y public key is attached. Please send all future message encrypted with my public key.” ⁄>Strick Barney The Authentication Server: “Frank, Suspicious_Client is clear to talk on this network. His keys were signed by our CA. His public key is attached, send future communication to him using it.“
So you may wonder, why can’t a malicious user request the server certificate from the server and then pretend to be him? The answer to that is, only the server’s private key can decrypt the data encrypted with his public key. This is the defining quality of asymmetric encryption; a private key can decrypt a message encrypted with it’s corresponding public key. This is why private keys should be highly guarded, otherwise why use this complicated process. Private keys should be guarded with restrictive permissions on an encrypted hard drive. Occasionally a private key isn’t needed, such as the case for just verifying identity. When verifying an identity both participants can use their copies of public keys to compare hash outputs of a common input such as a shared random string.
What is a X.509 certificate?
X.509 certificates make the interwebs go-’round. These certificates establish trust between parties and utilize asymmetric encryption for communication. For the typical user, this interaction is completely transparent and most aren’t aware it is happening. For example, when you visit gmail.com you get redirected not only to mail.google.com but also to a secure transaction (a TLS connection aka HTTPS). This means all the data that transverses the various routers of the internet are encrypted from your browser to the particular Google server you’re connected to. This happens because your browser comes pre-installed-trusting the root Certificate Authorities such as Comodo, DigiCert, Entrust, GlobalSign, GoDaddy, and VeriSign to name a few.
So why are X.509 certificates needed for EAP-TLS? Well again, to establish trust between both parties. These certificates provide proof that both parties are who they say they are by checking their digital signature. And only further communication can occur if the recipient can decrypt the data with their corresponding private key.
You may have notice, I still have yet to answer the question above. To answer the question above, a single X.509 certificate is a file; This file can contain anything from a CA public or private key, a server public or private key, or a client public or private key. To make things further complicated, some of these files can be bundled with others to create a neat import package. Later in this guide we’ll use a bundling process for the Android client certificates. Without a third party application it is not possible to directly import a CA public key on Android OS. To get around this, we’ll bundle the private client key, public client key, and the public CA key into one file which Android happily accepts, installs, and trusts all three.
What a X.509 file contains is the following: a certificate version number field (this correlates to a formatting standard), a serial number field (this correlates back to the CA’s sequentially issued number for the certificate), algorithm ID field (this field indicates which hash function is used; common ones are md5 and sha1), issuers field (this field contains the Certificate Authority’s Country, State, Locality, Organization, Org Unit, and Common Name), Validity field (this will contain two time stamps; the first time stamp says this certificate isn’t valid before and the second is not valid after.), Subject field (contains the Country, State, Locality, Organization, Org Unit, and Common Name; common names are typically tied to a domain name or sub-domain name [intermediate level] or a login name [client level]) , and Subject Public Key Info (contains the bit size, algorithm, and the signature.) Below is an example of the contents of a intermediate/server certificate signed by Thawte for freesoft.org.
Certificate:
    Data:
        Version: 1 (0x0)
        Serial Number: 7829 (0x1e95)
        Signature Algorithm: md5WithRSAEncryption
        Issuer: C=ZA, ST=Western Cape, L=Cape Town, O=Thawte Consulting cc,
                OU=Certification Services Division,
                CN=Thawte Server CA/emailAddress=server-certs@thawte.com
        Validity
            Not Before: Jul  9 16:04:02 1998 GMT
            Not After : Jul  9 16:04:02 1999 GMT
        Subject: C=US, ST=Maryland, L=Pasadena, O=Brent Baccala,
                    OU=FreeSoft, CN=www.freesoft.org/emailAddress=baccala@freesoft.org
        Subject Public Key Info:
            Public Key Algorithm: rsaEncryption
            RSA Public Key: (1024 bit)
                Modulus (1024 bit):
                    00:b4:31:98:0a:c4:bc:62:c1:88:aa:dc:b0:c8:bb:
                    33:35:19:d5:0c:64:b9:3d:41:b2:96:fc:f3:31:e1:
                    66:36:d0:8e:56:12:44:ba:75:eb:e8:1c:9c:5b:66:
                    70:33:52:14:c9:ec:4f:91:51:70:39:de:53:85:17:
                    16:94:6e:ee:f4:d5:6f:d5:ca:b3:47:5e:1b:0c:7b:
                    c5:cc:2b:6b:c1:90:c3:16:31:0d:bf:7a:c7:47:77:
                    8f:a0:21:c7:4c:d0:16:65:00:c1:0f:d7:b8:80:e3:
                    d2:75:6b:c1:ea:9e:5c:5c:ea:7d:c1:a1:10:bc:b8:
                    e8:35:1c:9e:27:52:7e:41:8f
                Exponent: 65537 (0x10001)
    Signature Algorithm: md5WithRSAEncryption
        93:5f:8f:5f:c5:af:bf:0a:ab:a5:6d:fb:24:5f:b6:59:5d:9d:
        92:2e:4a:1b:8b:ac:7d:99:17:5d:cd:19:f6:ad:ef:63:2f:92:
        ab:2f:4b:cf:0a:13:90:ee:2c:0e:43:03:be:f6:ea:8e:9c:67:
        d0:a2:40:03:f7:ef:6a:15:09:79:a9:46:ed:b7:16:1b:41:72:
        0d:19:aa:ad:dd:9a:df:ab:97:50:65:f5:5e:85:a6:ef:19:d1:
        5a:de:9d:ea:63:cd:cb:cc:6d:5d:01:85:b5:6d:c8:f3:d9:f7:
        8f:0e:fc:ba:1f:34:e9:96:6e:6c:cf:f2:ef:9b:bf:de:b5:22:
        68:9f
Why go through all this trouble?
Simply put, wireless networks as a concept is insecure. It nearly as bad as leaving a CAT5 network cable hanging out of your house connected to a hub on your internet line. Even when your wireless network is secured using common security protocols such as WEP, WPA, and WPA2 (except EAP-TLS) the password, pin, or encryption keys can be recovered or spoofed. Every packet gets sent into the air and anyone within ear-shot, so to speak, can just nab it and analyze the traffic. WEP is highly insecure and should never be used in any circumstance… ever. WPA/WPA2 with WPS active is also considered insecure as the 8 digit code can be recovered within a couple of days after monitoring the network traffic. As for WPA/WPA2 PSK aka WPA/WPA2 Personal the password can be brute forced after obtaining the PMK which as described above is not an impossible task.
Another positive consideration for implementing EAP-TLS, is the traffic is secure from peer on peer snooping. Only the client with their private key can decrypt their intended data. With WPA/2-PSK it is possible to decrypt your peers’ session keys (aka their Pairwise Transient Key) because the Pairwise Master Key is commonly shared/known for all clients on the wireless network.
So again, why? Why can’t I just create a really long password using WPA2 PSK. My answer to that is: you can and probably never have a problem. But I think EAP-TLS is cool, it is uncommon, and a challenge to implement.
What Is Needed
This go around I am using a virtual machine to run FreeBSD. In the future I plan on toying around with installing FreeBSD to a Raspberry Pi and running the RADIUS server as a literal piggy back. With the intention of using my AP’s USB for power; kind of a fun symbiotic relationship I think.
Here is what is needed to complete this project:
- A basic, 24/7 machine to run FreeBSD (Anything from a virtual machine to a RaspberryPi)
- A modern wireless router or access point (preferably one running DD-WRT)
- Wireless clients capable of WPA2 Enterprise authentication (iOS, Apple’s OS X 10.3+, Microsoft Windows XP/2000 SP4/7+, most variants of free OSes, and Android will work. The PS3 won’t work.)
- An interest in the subject and a desire to get this working in your own environment.
Downsides to EAP-TLS
- EAP-TLS is not supported on all wireless enabled devices. As an example, the PS3 is not able to be configured with this authentication method. Also some Wifi-connected thermostats aren’t compatible for the same reason. But all WiFi-Certified devices are compatible as part of this certification from the WiFi Alliance.
- Another downside is certificates expire, leaving that device unusable until a new current certificate is created and installed on the device. Granted you can make the certificates last as long as you want from one day to the remainder of your lifetime.
- Key management can be an issue if you have a lot of clients with high turnover rate. Revoking a license is possible but not covered in this version of the guide. See here for more information. Will topic be covered in version 2 of this guide.
- And lastly granting access to guests requires issuing them a certificate and revoking it when they leave. An alternative is to create a virtual wireless connection using WPA2-PSK for the duration of your guests’ stay.
How to
For this to work we need to create a very barebones server; a no frills setup, just the basics. SSH, FreeRADIUS2, ssl-admin, and the supporting dependencies. I’m using FreeBSD in this guide because of the general concern for security of FreeBSD, the ports tree is really cool if you prefer to install from source, FreeBSD is fairly easy to adapt to if you have some background in Linux, and lastly and most influential, FreeBSD is the basis of many of the appliances running on top of my Hypervisor.
Installing FreeBSD
Make sure to install the Ports tree as we will be installing freeradius2 from it; no other optinal system components are required from this menu.

Set the IP to a static address. This is necessary so your AP knows where to point the RADIUS requests. In this guide the FreeBSD’s IP is 10.0.0.254.
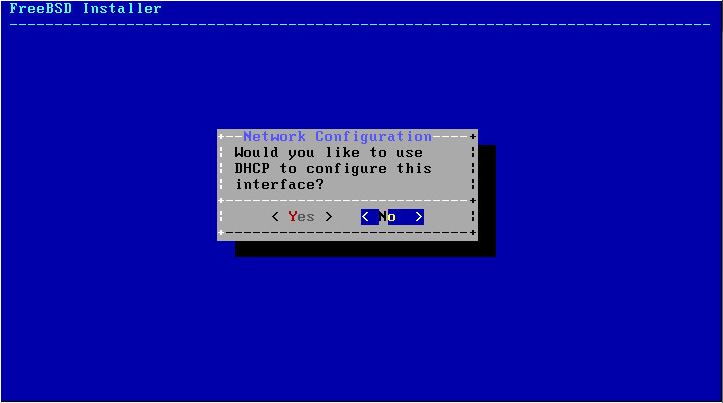
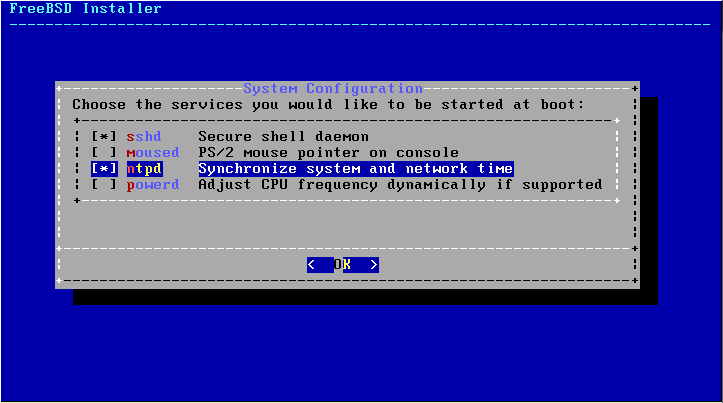
Make sure to enable sshd so you can remotely log into the server to initially diagnose radiusd when it’s running in debug mode. Also enabling ntpd is a suggested as you’ll need the correct time for the certificates to work.
Changes to the FreeBSD base install
First off you’ll want to update the time so the certificates are properly time stamped by issuing this command:
# ntpdate -v -b in.pool.ntp.org
Enable SSHd root logins
Next temporarily enable root access via ssh by editing the following line in /etc/ssh/sshd_config
44: PermitRootLogin yes
And also changing the following lines enables two factor authentication for ssh logins.
49:  RSAAuthentication yes
50:  PubkeyAuthentication yes
53:  AuthorizedKeysFile .ssh/authorized_keys
Installing FreeRADIUS2
In this guide we’ll be using the ports tree to install FreeRADIUS2. If you aren’t terribly familiar with FreeBSD’s ports tree, it’s pretty neat.
”[The] ports tree is simply that — a hierarchy of applications that have been ported to FreeBSD. Each directory contains a Makefile and any patches that are required for that particular app to compile and run on FreeBSD” ~ [1]
When prompted for build options for freeradius2, only select ssl_port and user; you’ll be prompted later for more build options for freeradius2’s dependencies but the defaults are fine if you aren’t comfortable changing them.
# cd /usr/ports/net/freeradius2
# make install clean
Configuring FreeRADIUS2
The configuration folder for FreeRADIUS2 is located in /usr/local/etc/raddb. Below is the entire configuration for each of the follow configuration files; the comments have been pruned and the bold portions are the section you should edit, specific to your install. I have also pruned sections of each configuration files that make freeradius2 less secure (such as EAP-MD5) or section that add bloat (such as accounting.)
First you’ll need to edit /usr/local/etc/raddb/radiusd.conf This file is the daemon file and contains the bulk of the options for the daemon.
prefix = /usr/local
exec_prefix = ${prefix}
sysconfdir = ${prefix}/etc
localstatedir = /var
sbindir = ${exec_prefix}/sbin
logdir = /var/log
raddbdir = ${sysconfdir}/raddb
radacctdir = ${logdir}/radacct
name = radiusd
confdir = ${raddbdir}
run_dir = ${localstatedir}/run/${name}
db_dir = ${raddbdir}
libdir = /usr/local/lib/freeradius-2.2.2
pidfile = ${run_dir}/${name}.pid
user = freeradius
group = freeradius
max_request_time = 30
cleanup_delay = 5
# max_requests: This should be 256 multiplied by the number of clients.
max_requests = 1024

listen {
type = auth
ipaddr = 10.0.0.254
port = 0
}

allow_core_dumps = no
regular_expressions = yes
extended_expressions = yes

log {
destination = files
file = ${logdir}/radius.log
stripped_names = no
auth = yes
auth_badpass = no
auth_goodpass = no
}

checkrad = ${sbindir}/checkrad

security {
max_attributes = 200
reject_delay = 1
status_server = yes
}

proxy_requests = no
$INCLUDE clients.conf

thread pool {
start_servers = 5
max_servers = 32
min_spare_servers = 3
max_spare_servers = 10
max_requests_per_server = 0
}

modules {
$INCLUDE ${confdir}/modules/
$INCLUDE eap.conf
}

instantiate {
exec
expr
expiration
logintime
}

$INCLUDE policy.conf
$INCLUDE sites-enabled
Next edit /usr/local/etc/raddb/clients.conf This file tells the daemon which AP or Routers can connect to the server and utilize it’s services. Even though it’s named clients.conf it refers to the Authenticator in the 802.1X process (not to be confused with Authentication Server which is the freeradius2 FreeBSD server in this guide.)
client wifiapname {
ipaddr = 10.0.0.2
secret = MakeThisRandomStringLongAsItWillNeverBeNeededToTypedIn.IfUsingDD-WRTTheUndocumentedMaxLengthIs79Characters
require_message_authenticator = yes
nastype = other
}
Next edit /usr/local/etc/raddb/eap.conf This tells which EAP methods are okay to use and the parameters of the available methods. For our purpose this configuration has been heavily pruned of comments and more importantly pruned of insecure EAP methods. The less secure methods of EAP have been prune because even if your clients are not configured for them, any malicious person can request to use them and the AS will be obliged to use the less secure methods. We’ll be coming back to this configuration file later on to do final touches after the X.509 certificates have been created.
eap {
default_eap_type = tls
timer_expire = 60
ignore_unknown_eap_types = no
cisco_accounting_username_bug = no
max_sessions = 4096

tls {
certdir = /usr/local/etc/ssl-admin/active
cadir = /usr/local/etc/ssl-admin/active
private_key_password = whatever
private_key_file = ${certdir}/server.pem
certificate_file = ${certdir}/server.pem
CA_file = ${cadir}/ca.pem
dh_file = ${certdir}/dh
random_file = /dev/random
# check_crl = yes
cipher_list = "HIGH"   # This selects only strong ciphers

verify {
tmpdir = /tmp/radiusd
client = "/usr/local/bin/openssl verify -CAfile /usr/local/etc/ssl-admin/active/ca.crt %{TLS-Client-Cert-Filename}"
} # Closes Verify
} # Closes TLS
} # Closes EAP
Above you’ll notice the cipher_list has been changed to HIGH this is important because it does not select weak encryption algorithms that include RC4; which is in the default list. You may also notice under the verify function the openssl verify command; this command is useful if you are having issues and suspect there is a problem with the certificates.
These commands setup the individual AP configurations/settings/profiles.
# cd /usr/local/etc/raddb/sites-available/
# cp example wifiapname
# cd /usr/local/etc/raddb/sites-enabled
# rm *
# ln -s ../sites-available/wifiapname ./wifiapname
Configure APs Configs
Next edit /usr/local/etc/raddb/sites-available/wifiapname.
authorize {
preprocess
auth_log
eap {
ok = return
}

expiration
logintime
}

authenticate {
eap
}

preacct {
preprocess
}
acct_unique
suffix
files
}

session {
radutmp
}
post-auth {
exec
Post-Auth-Type REJECT {
attr_filter.access_reject
}
}
Creating the X.509 Self -Signed Certificates
Previously this is the part I would typically get stuck. When I used the certificate creation script that came with freeradius2 only the latest certificate created would be valid. So instead ssl-admin was used to create the certificates. ssl-admin has been great for creating multiple certificate that all check out as valid when checked with the openssl verify command against the CA certificate.
Install ssl-admin
ssl-admin is a tool written by some OpenVPN developers to help manage CAs and other certificates with intended use for OpenVPN. However, this tool works really well for our purpose of creating several certificates for various functions (CA, Server Cert, and client certs.) We’ll need to create a Certificate Authority (CA) which acts as the absolute authority on whether a certificate that claims to be signed by us is actually signed by us. Then we’ll create a server certificate which will be used by the authentication server to encrypt data between itself and it’s connecting clients. The server will also get a copy of the CA’s public key to verify clients. Then each client will get a set of their own certificates of public and private keys, and a copy of the CA’s public key. Below are the commands to build ssl-admin from ports.
# cd /usr/ports/security/ssl-admin
# make install clean
Configure
Time to edit /usr/local/etc/ssl-admin/openvpn.conf
# OpenSSL Configuration File for ssl-admin

dir                = $ENV::KEY_DIR

[ca]
default_ca            = CA_default

[CA_default]
serial                = $dir/prog/serial
database            = $dir/prog/index.txt
new_certs_dir            = $dir/active
certificate            = $dir/active/ca.crt
private_key            = $dir/active/ca.key
default_days            = $ENV::KEY_DAYS
default_crl_days        = 30
default_md            = sha512
preserve            = no
email_in_dn            = yes
nameopt                = default_ca
certopt                = default_ca
policy                = policy_match

[ policy_match ]
countryName            = match
stateOrProvinceName        = match
organizationName        = match
organizationalUnitName        = optional
commonName            = supplied
emailAddress            = optional

[ policy_new_ca]
countryName            = supplied
stateOrProvinceName        = supplied
organizationName        = supplied
organizationalUnitName        = optional
commonName            = supplied
emailAddress            = optional

[ req ]
default_bits            = $ENV::KEY_SIZE
default_keyfile         = privkey.pem
default_md            = sha512
string_mask            = nombstr
distinguished_name        = req_distinguished_name
req_extensions            = v3_req

[ req_distinguished_name ]
# Prompts
countryName            = US
countryName_min            = 2
countryName_max            = 2
stateOrProvinceName        = New Mexico
localityName            = Albuquerque
0.organizationName        = Lead Street Security
organizationalUnitName        = Wifi Security
commonName            = epijunkie.com
commonName_max            = 64
emailAddress            = webmaster@epijunkie.com
emailAddress_max        = 40

# Default Variables (environment variables set from ssl-admin.pl script.
countryName_default        = $ENV::KEY_COUNTRY
commonName_default        = $ENV::KEY_CN
emailAddress_default        = $ENV::KEY_EMAIL
0.organizationName_default    = $ENV::KEY_ORG
stateOrProvinceName_default    = $ENV::KEY_PROVINCE
localityName_default        = $ENV::KEY_CITY

[ server ]

# JY ADDED -- Make a cert with nsCertType set to "server"
basicConstraints=CA:FALSE
nsCertType            = server
nsComment            = "ssl-admin (OpenSSL) Generated Server Certificate"
subjectKeyIdentifier        = hash
authorityKeyIdentifier        = keyid,issuer:always
extendedKeyUsage        = serverAuth
keyUsage             = digitalSignature, keyEncipherment

[ v3_req ]
basicConstraints         = CA:FALSE
keyUsage             = keyAgreement, nonRepudiation, digitalSignature, keyEncipherment
extendedKeyUsage        = clientAuth
crlDistributionPoints        = $ENV::KEY_CRL_LOC

[ v3_ca ]
basicConstraints         = CA:TRUE
subjectKeyIdentifier        = hash
authorityKeyIdentifier        = keyid:always,issuer:always
crlDistributionPoints        = $ENV::KEY_CRL_LOC
Copy defaults
Next run the command below to copy the defaults of ssl-admin.conf:
# cp /usr/local/etc/ssl-admin/ssl-admin.conf.default /usr/local/etc/ssl-admin/ssl-admin.conf
###
Time to edit /usr/local/etc/ssl-admin/ssl-admin.conf
## Set default values here.
#
# The following values can be changed without affecting
# your CA key.

$ENV{'KEY_SIZE'} = "4096";
$ENV{'KEY_DAYS'} = "3650";
$ENV{'KEY_CN'} = "";
$ENV{'KEY_CRL_LOC'} = "URI:http://CRL_URI";

## WARNING!!! ##
#
# Changing the following values has vast consequences.
# These values must match what's in your root CA certificate.

$ENV{'KEY_COUNTRY'} = "US";
$ENV{'KEY_PROVINCE'} = "New Mexico";
$ENV{'KEY_CITY'} = "Albuquerque";
$ENV{'KEY_ORG'} = "Lead Street Security";
$ENV{'KEY_EMAIL'} = 'webmaster@epijunkie.com';
Create self signed CA
# cd /usr/local/etc/ssl-admin/
# ssl-admin
This program will walk you through requesting, signing,
organizing and revoking SSL certificates.

Looks like this is a new install, installing...
You will first need to edit the /usr/local/etc/ssl-admin/ssl-admin.conf
default variables.  Have you done this? (y/n): y
I need the CA credentials.  Would you like to create a new CA key and
certificate now?  (y/n): y
Please enter certificate owner's name or ID.
Usual format is first initial-last name (jdoe) or
hostname of server which will use this certificate.
All lower case, numbers OK.
Owner []: epijunkie.com

File names will use epijunkie.com.

===> Creating private key with 4096 bits and generating request.
Do you want to password protect your CA private key? (y/n): y
Generating RSA private key, 4096 bit long modulus
..............................++
................................................................................
........................++
e is 65537 (0x10001)
Enter pass phrase for epijunkie.com.key: ThisShouldBeLongToo
Verifying - Enter pass phrase for epijunkie.com.key: ThisShouldBeLongToo
===> Self-Signing request.
Enter pass phrase for /usr/local/etc/ssl-admin/epijunkie.com.key: ThisShouldBeLongToo
===> Moving certficate and key to appropriate directory.
===> Creating initial CRL.Using configuration from /usr/local/etc/ssl-admin/openssl.conf
Enter pass phrase for /usr/local/etc/ssl-admin/active/ca.key: ThisShouldBeLongToo
The Owner field for the CA should be named after a domain name or local machine which the CA will reside. Use a long password (I’d suggest 32+ characters) here that utilizes symbols, numbers, and upper and lower letters.
Next create server certificate
# cd /usr/local/etc/ssl-admin/
# ssl-admin
This program will walk you through requesting, signing,
organizing and revoking SSL certificates.

===> Creating initial CRL.Using configuration from /usr/local/etc/ssl-admin/open
ssl.conf
Enter pass phrase for /usr/local/etc/ssl-admin/active/ca.key: ThisShouldBeLongToo
ssl-admin installed Sun Dec 29 16:02:41 MST 2013
OPTIONAL: I can't find your OpenVPN client config.  Please copy your config to
/usr/local/etc/ssl-admin/packages/client.ovpn

=====================================================
#                  SSL-ADMIN                        #
=====================================================
Please enter the menu option from the following list:
1) Update run-time options:
     Key Duration (days): 3650
     Current Serial #: 01
     Key Size (bits): 4096
     Intermediate CA Signing: NO
2) Create new Certificate Request
3) Sign a Certificate Request
4) Perform a one-step request/sign
5) Revoke a Certificate
6) Renew/Re-sign a past Certificate Request
7) View current Certificate Revokation List
8) View index information for certificate.
i) Generate a user config with in-line certifcates and keys.
z) Zip files for end user.
dh) Generate Diffie Hellman parameters.
CA) Create new Self-Signed CA certificate.
S) Create new Signed Server certificate.
q) Quit ssl-admin

Menu Item: S
Please enter certificate owner's name or ID.
Usual format is first initial-last name (jdoe) or
hostname of server which will use this certificate.
All lower case, numbers OK.
Owner []: wifiapname

File names will use wifiapname.
Please enter certificate owner's name or ID.
Usual format is first initial-last name (jdoe) or
hostname of server which will use this certificate.
All lower case, numbers OK.
Owner [wifiapname]:
Would you like to password protect the private key (y/n): y
Generating a 4096 bit RSA private key
................................................................................
.............................++
...................................++
writing new private key to 'wifiapname.key'
Enter PEM pass phrase: ThisKeyMustMatchYourEAP.confFileOtherWiseItWontWork
Verifying - Enter PEM pass phrase: ThisKeyMustMatchYourEAP.confFileOtherWiseItWontWork
-----
===> Serial Number = 01
Using configuration from /usr/local/etc/ssl-admin/openssl.conf
Enter pass phrase for /usr/local/etc/ssl-admin/active/ca.key: ThisShouldBeLongToo
Check that the request matches the signature
Signature ok
The Subject's Distinguished Name is as follows
countryName           :PRINTABLE:'US'
stateOrProvinceName   :PRINTABLE:'New Mexico'
localityName          :PRINTABLE:'Albuquerque'
organizationName      :PRINTABLE:'Lead Street Security'
commonName            :PRINTABLE:'wifiapname'
emailAddress          :IA5STRING:'webmaster@epijunkie.com'
Certificate is to be certified until Dec 27 23:08:26 2023 GMT (3650 days)

Write out database with 1 new entries
Data Base Updated
=========> Moving certificates and keys to /usr/local/etc/ssl-admin/active for production.
Can I move signing request (wifiapname.csr) to the csr directory for archiving?
(y/n): y
===> wifiapname.csr moved.
The server certificate’s Owner field should be set to the primary wireless access point name. Use a different long password here (I’d suggest 32+ characters) that utilizes symbols, numbers, and upper and lower letters. This password will be stored in the eap.conf file later on.
Create OSX client certificate
# cd /usr/local/etc/ssl-admin/
# ssl-admin
This program will walk you through requesting, signing,
organizing and revoking SSL certificates.

ssl-admin installed Sun Dec 29 16:02:41 MST 2013
OPTIONAL: I can't find your OpenVPN client config.  Please copy your config to
/usr/local/etc/ssl-admin/packages/client.ovpn

=====================================================
#                  SSL-ADMIN                        #
=====================================================
Please enter the menu option from the following list:
1) Update run-time options:
Key Duration (days): 3650
Current Serial #: 02
Key Size (bits): 4096
Intermediate CA Signing: NO
2) Create new Certificate Request
3) Sign a Certificate Request
4) Perform a one-step request/sign
5) Revoke a Certificate
6) Renew/Re-sign a past Certificate Request
7) View current Certificate Revokation List
8) View index information for certificate.
i) Generate a user config with in-line certifcates and keys.
z) Zip files for end user.
dh) Generate Diffie Hellman parameters.
CA) Create new Self-Signed CA certificate.
S) Create new Signed Server certificate.
q) Quit ssl-admin

Menu Item: 4
Please enter certificate owner's name or ID.
Usual format is first initial-last name (jdoe) or
hostname of server which will use this certificate.
All lower case, numbers OK.
Owner []: tutmac

File names will use tutmac.
Please enter certificate owner's name or ID.
Usual format is first initial-last name (jdoe) or
hostname of server which will use this certificate.
All lower case, numbers OK.
Owner [tutmac]:
Would you like to password protect the private key (y/n): y
Generating a 4096 bit RSA private key
............................................................................++
................................................................................
......................................++
writing new private key to 'tutmac.key'
Enter PEM pass phrase: ThisKeyShouldBe>=16Chars
Verifying - Enter PEM pass phrase: ThisKeyShouldBe>=16Chars
-----
===> Serial Number = 02
=========> Signing request for tutmac
Using configuration from /usr/local/etc/ssl-admin/openssl.conf
Enter pass phrase for /usr/local/etc/ssl-admin/active/ca.key: ThisShouldBeLongToo
Check that the request matches the signature
Signature ok
The Subject's Distinguished Name is as follows
countryName           :PRINTABLE:'US'
stateOrProvinceName   :PRINTABLE:'New Mexico'
localityName          :PRINTABLE:'Albuquerque'
organizationName      :PRINTABLE:'Lead Street Security'
commonName            :PRINTABLE:'tutmac'
emailAddress          :IA5STRING:'webmaster@epijunkie.com'
Certificate is to be certified until Dec 27 23:32:02 2023 GMT (3650 days)

Write out database with 1 new entries
Data Base Updated
=========> Moving certificates and keys to /usr/local/etc/ssl-admin/active for p
roduction.
Can I move signing request (tutmac.csr) to the csr directory for archiving? (y/n
): ===> tutmac.csr moved.
The Owner field for the client should be indicative of the machine it’s going on; whether that’s a host name or other unique ID. The input used in this field will also be used on the client as the username when connecting. Use a long password unique to this client (I’d suggest 16+ characters) that utilizes symbols, numbers, and upper and lower letters.
Create OSX keyfile bundle
This bundling is necessary as OSX needs to associate the public and private key together on import to function correctly.
# cd /usr/local/etc/ssl-admin/
# /usr/local/bin/openssl pkcs12 -export -in ./active/tutmac.crt -inkey ./active/tutmac.key -out tutmac_bundle.p12
WARNING: can't open config file: /usr/local/openssl/openssl.cnf
Enter pass phrase for ./active/tutmac.key: ThisKeyShouldBe>=16Chars
Enter Export Password: ThisKeyShouldBe>=16Chars
Verifying - Enter Export Password: ThisKeyShouldBe>=16Chars
Create Android client certificate
# cd /usr/local/etc/ssl-admin/
# ssl-admin
This program will walk you through requesting, signing,
organizing and revoking SSL certificates.

ssl-admin installed Sun Dec 29 16:02:41 MST 2013
OPTIONAL: I can't find your OpenVPN client config.  Please copy your config to
/usr/local/etc/ssl-admin/packages/client.ovpn
=====================================================
#                  SSL-ADMIN                        #
=====================================================
Please enter the menu option from the following list:
1) Update run-time options:
Key Duration (days): 3650
Current Serial #: 03
Key Size (bits): 4096
Intermediate CA Signing: NO
2) Create new Certificate Request
3) Sign a Certificate Request
4) Perform a one-step request/sign
5) Revoke a Certificate
6) Renew/Re-sign a past Certificate Request
7) View current Certificate Revokation List
8) View index information for certificate.
i) Generate a user config with in-line certifcates and keys.
z) Zip files for end user.
dh) Generate Diffie Hellman parameters.
CA) Create new Self-Signed CA certificate.
S) Create new Signed Server certificate.
q) Quit ssl-admin

Menu Item: 4
Please enter certificate owner's name or ID.
Usual format is first initial-last name (jdoe) or
hostname of server which will use this certificate.
All lower case, numbers OK.
Owner []: tutandroid

File names will use tutandroid.
Please enter certificate owner's name or ID.
Usual format is first initial-last name (jdoe) or
hostname of server which will use this certificate.
All lower case, numbers OK.
Owner [tutandroid]:
Would you like to password protect the private key (y/n): y
Generating a 4096 bit RSA private key
..........................................++
................................................................................
.....................................++
writing new private key to 'tutandroid.key'
Enter PEM pass phrase: rememberthiskeywillbetypein
Verifying - Enter PEM pass phrase: rememberthiskeywillbetypein
-----
===> Serial Number = 03
=========> Signing request for tutandroid
Using configuration from /usr/local/etc/ssl-admin/openssl.conf
Enter pass phrase for /usr/local/etc/ssl-admin/active/ca.key: ThisShouldBeLongToo
Check that the request matches the signature
Signature ok
The Subject's Distinguished Name is as follows
countryName           :PRINTABLE:'US'
stateOrProvinceName   :PRINTABLE:'New Mexico'
localityName          :PRINTABLE:'Albuquerque'
organizationName      :PRINTABLE:'Lead Street Security'
commonName            :PRINTABLE:'tutandroid'
emailAddress          :IA5STRING:'webmaster@epijunkie.com'
Certificate is to be certified until Dec 27 23:39:33 2023 GMT (3650 days)

Write out database with 1 new entries
Data Base Updated
=========> Moving certificates and keys to /usr/local/etc/ssl-admin/active for p
roduction.
Can I move signing request (tutandroid.csr) to the csr directory for archiving?
(y/n): ===> tutandroid.csr moved.
The Owner field for the client should be indicative of the machine it’s going on; whether that’s a host name or other unique ID. The input used in this field will also be used on the client as the username when connecting. Use a long password unique to this client (I’d suggest 16+ characters) that utilizes symbols, numbers, and upper and lower letters.
Create Android keyfile bundle
After creating the Android device’s certificate you’ll need to bundle the CA public key, the Android device’s private key, and the Android device’s public key into one file using the OpenSSL command line. To my knowledge Android won’t import a CA public key outright so you have to bundle it with keys it will accept. Which is amusing because OS X will not recognize a file bundled with all three certificates.
# cd /usr/local/etc/ssl-admin/
# openssl pkcs12 -export -out tutandroid_android.p12 -in ./active/tutandroid.pem -inkey ./active/tutandroid.key -certfile /usr/local/etc/ssl-admin/active/ca.crt
Enter pass phrase for ./active/tutandroid.key: rememberthiskeywillbetypein
Enter Export Password: rememberthiskeywillbetypein
Verifying - Enter Export Password: rememberthiskeywillbetypein
Create the Diffie Hellman file
This will take awhile especially if you select a 4096 bit key. For a frame of reference, it took 55 Minutes on a Xeon L5630 2.13Ghz; my binary of openssl isn’t threaded so only one of my cores was pegged out for the duration of this dh parameter build.
# cd /usr/local/etc/ssl-admin/
# ssl-admin
This program will walk you through requesting, signing,
organizing and revoking SSL certificates.

ssl-admin installed Sun Dec 29 16:02:41 MST 2013
OPTIONAL: I can't find your OpenVPN client config.  Please copy your config to
/usr/local/etc/ssl-admin/packages/client.ovpn

=====================================================
#                  SSL-ADMIN                        #
=====================================================
Please enter the menu option from the following list:
1) Update run-time options:
Key Duration (days): 3650
Current Serial #: 04
Key Size (bits): 4096
Intermediate CA Signing: NO
2) Create new Certificate Request
3) Sign a Certificate Request
4) Perform a one-step request/sign
5) Revoke a Certificate
6) Renew/Re-sign a past Certificate Request
7) View current Certificate Revokation List
8) View index information for certificate.
i) Generate a user config with in-line certifcates and keys.
z) Zip files for end user.
dh) Generate Diffie Hellman parameters.
CA) Create new Self-Signed CA certificate.
S) Create new Signed Server certificate.
q) Quit ssl-admin

Menu Item: dh
Generating DH parameters, 4096 bit long safe prime, generator 2
This is going to take a long time
................................................................................
.............................................................+..................
..............................................+.................................
................................................................................
<Lines Omitted>
......................................................+.........................
...............................................................+................
...+............................................................................
................................................................................
................................................................................
...............................+................................................
................................................................................
.........................................................+..........+...........
................................................................................
.....................................................................++*++*
Your Diffie Hellman parameters have been created.
Configure FreeRADIUS to use self-signed certificates
Modify /usr/local/etc/raddb/eap.conf to reflect the newly created certificates:
eap {
default_eap_type = tls
timer_expire     = 60
ignore_unknown_eap_types = no
cisco_accounting_username_bug = no
max_sessions = 4096

tls {
certdir = /usr/local/etc/ssl-admin/active
cadir = /usr/local/etc/ssl-admin/active
private_key_password = ThisKeyMustMatchYourEAP.confFileOtherWiseItWontWork
private_key_file = ${certdir}/wifiapname.key
certificate_file = ${certdir}/wifiapname.pem
CA_file = ${cadir}/ca.crt
dh_file = /usr/local/etc/ssl-admin/dh4096.pem
random_file = /dev/random
#    check_crl = yes
cipher_list = "HIGH"

verify {
tmpdir = /tmp/radiusd
client = "/usr/local/bin/openssl verify -CAfile /usr/local/etc/ssl-admin/active/ca.crt %{TLS-Client-Cert-Filename}"
} # Closes Verify
} # Closes TLS
} # Closes EAP
Cleaning up the permissions and files:
First we’re going to delete the modules that are insecure or not useful for this lightweight install. Then well create a folder /tmp/radiusd where attempting Supplicant certificates will be temporarily stored during authentication. Followed by fixing permissions to only allow the user freeradius to access the bulk of the certificates and the eap.conf file which contains the server private key password in plain text.
# cd /usr/local/etc/raddb/modules/
# rm chap digest ldap krb5 mschap ntlm_auth pam passwd smbpasswd unix wimax
# mkdir /tmp/radiusd
# chown freeradius:freeradius /tmp/radiusd
# chmod -R 700 /tmp/radiusd
# chown -R freeradius:freeradius /usr/local/etc/ssl-admin/
# chmod -R 700 /usr/local/etc/ssl-admin/
# chown -R freeradius:freeradius /usr/local/etc/raddb/
# chmod -R 700 /usr/local/etc/raddb/
# chown -R freeradius:freeradius /usr/local/etc/raddb/eap.conf
Configuring the Access Point
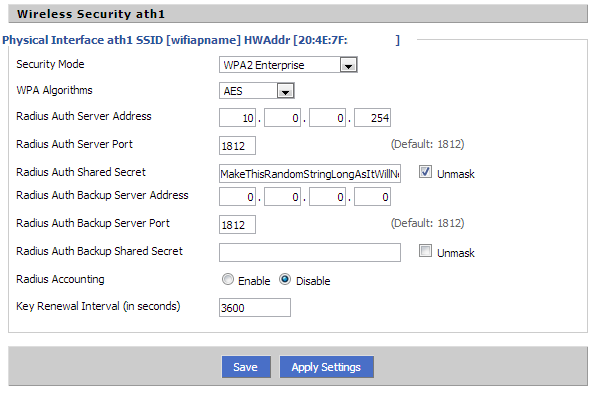
I’d suggest using a router/AP capable of running DD-WRT. It’s a custom firmware that runs on many home/SOHO class routers and AP devices, your’s may be supported. Below is a region screenshot of the Wireless > Wireless Security section for this tutorial’s wireless setup.
DD-WRT isn’t required but is known to work well with 802.1X wireless access. My stock Netgear firmware on my AP allowed for this to work as well but I’m typically not one to keep things stock.
Check FreeRADIUS configs
# radiusd -X
radiusd: FreeRADIUS Version 2.2.2, for host amd64-portbld-freebsd9.2, built on D
ec 22 2013 at 11:45:21
Copyright (C) 1999-2013 The FreeRADIUS server project and contributors.
There is NO warranty; not even for MERCHANTABILITY or FITNESS FOR A
PARTICULAR PURPOSE.
You may redistribute copies of FreeRADIUS under the terms of the
GNU General Public License.
For more information about these matters, see the file named COPYRIGHT.
Starting - reading configuration files ...
including configuration file /usr/local/etc/raddb/radiusd.conf
including configuration file /usr/local/etc/raddb/clients.conf
including files in directory /usr/local/etc/raddb/modules/
including configuration file /usr/local/etc/raddb/modules/always
including configuration file /usr/local/etc/raddb/modules/attr_filter
including configuration file /usr/local/etc/raddb/modules/attr_rewrite
including configuration file /usr/local/etc/raddb/modules/cache
including configuration file /usr/local/etc/raddb/modules/checkval
including configuration file /usr/local/etc/raddb/modules/counter
including configuration file /usr/local/etc/raddb/modules/cui
including configuration file /usr/local/etc/raddb/modules/detail
including configuration file /usr/local/etc/raddb/modules/detail.example.com
including configuration file /usr/local/etc/raddb/modules/detail.log
including configuration file /usr/local/etc/raddb/modules/dhcp_sqlippool
including configuration file /usr/local/etc/raddb/sql/mysql/ippool-dhcp.conf
including configuration file /usr/local/etc/raddb/modules/dynamic_clients
including configuration file /usr/local/etc/raddb/modules/echo
including configuration file /usr/local/etc/raddb/modules/etc_group
including configuration file /usr/local/etc/raddb/modules/exec
including configuration file /usr/local/etc/raddb/modules/expiration
including configuration file /usr/local/etc/raddb/modules/expr
including configuration file /usr/local/etc/raddb/modules/files
including configuration file /usr/local/etc/raddb/modules/inner-eap
including configuration file /usr/local/etc/raddb/modules/ippool
including configuration file /usr/local/etc/raddb/modules/linelog
including configuration file /usr/local/etc/raddb/modules/otp
including configuration file /usr/local/etc/raddb/modules/logintime
including configuration file /usr/local/etc/raddb/modules/mac2ip
including configuration file /usr/local/etc/raddb/modules/mac2vlan
including configuration file /usr/local/etc/raddb/modules/opendirectory
including configuration file /usr/local/etc/raddb/modules/perl
including configuration file /usr/local/etc/raddb/modules/policy
including configuration file /usr/local/etc/raddb/modules/preprocess
including configuration file /usr/local/etc/raddb/modules/radrelay
including configuration file /usr/local/etc/raddb/modules/radutmp
including configuration file /usr/local/etc/raddb/modules/realm
including configuration file /usr/local/etc/raddb/modules/redis
including configuration file /usr/local/etc/raddb/modules/rediswho
including configuration file /usr/local/etc/raddb/modules/replicate
including configuration file /usr/local/etc/raddb/modules/smsotp
including configuration file /usr/local/etc/raddb/modules/soh
including configuration file /usr/local/etc/raddb/modules/sql_log
including configuration file /usr/local/etc/raddb/modules/sqlcounter_expire_on_l
ogin
including configuration file /usr/local/etc/raddb/modules/sradutmp
including configuration file /usr/local/etc/raddb/modules/acct_unique
including configuration file /usr/local/etc/raddb/eap.conf
including configuration file /usr/local/etc/raddb/policy.conf
including files in directory /usr/local/etc/raddb/sites-enabled/
including configuration file /usr/local/etc/raddb/sites-enabled/wifiapname
main {
        user = "freeradius"
        group = "freeradius"
        allow_core_dumps = no
}
including dictionary file /usr/local/etc/raddb/dictionary
main {
        name = "radiusd"
        prefix = "/usr/local"
        localstatedir = "/var"
        sbindir = "/usr/local/sbin"
        logdir = "/var/log"
        run_dir = "/var/run/radiusd"
        libdir = "/usr/local/lib/freeradius-2.2.2"
        radacctdir = "/var/log/radacct"
        hostname_lookups = no
        max_request_time = 30
        cleanup_delay = 5
        max_requests = 1024
        pidfile = "/var/run/radiusd/radiusd.pid"
        checkrad = "/usr/local/sbin/checkrad"
        debug_level = 0
        proxy_requests = no
 log {
        stripped_names = no
        auth = yes
        auth_badpass = no
        auth_goodpass = no
 }
 security {
        max_attributes = 200
        reject_delay = 1
        status_server = yes
 }
}
radiusd: #### Loading Realms and Home Servers ####
radiusd: #### Loading Clients ####
 client wifiapname {
        ipaddr = 10.0.0.2
        require_message_authenticator = yes
        secret = "MakeThisRandomStringLongAsItWillNeverBeNeededToTypedIn.IfUsingDDWRTTheMaxLengthIs79Characters"
        nastype = "other"
 }
radiusd: #### Instantiating modules ####
 instantiate {
 Module: Linked to module rlm_exec
 Module: Instantiating module "exec" from file /usr/local/etc/raddb/modules/exec
  exec {
        wait = no
        input_pairs = "request"
        shell_escape = yes
        timeout = 10
  }
 Module: Linked to module rlm_expr
 Module: Instantiating module "expr" from file /usr/local/etc/raddb/modules/expr
 Module: Linked to module rlm_expiration
 Module: Instantiating module "expiration" from file /usr/local/etc/raddb/modules/expiration
  expiration {
        reply-message = "Password Has Expired  "
  }
 Module: Linked to module rlm_logintime
 Module: Instantiating module "logintime" from file /usr/local/etc/raddb/modules/logintime
  logintime {
        reply-message = "You are calling outside your allowed timespan  "
        minimum-timeout = 60
  }
 }
radiusd: #### Loading Virtual Servers ####
server { # from file /usr/local/etc/raddb/radiusd.conf
 modules {
  Module: Creating Post-Auth-Type = REJECT
 Module: Checking authenticate {...} for more modules to load
 Module: Linked to module rlm_eap
 Module: Instantiating module "eap" from file /usr/local/etc/raddb/eap.conf
  eap {
        default_eap_type = "tls"
        timer_expire = 60
        ignore_unknown_eap_types = no
        cisco_accounting_username_bug = no
        max_sessions = 4096
  }
 Module: Linked to sub-module rlm_eap_tls
 Module: Instantiating eap-tls
   tls {
        rsa_key_exchange = no
        dh_key_exchange = yes
        rsa_key_length = 512
        dh_key_length = 512
        verify_depth = 0
        pem_file_type = yes
        private_key_file = "/usr/local/etc/ssl-admin/active/wifiapname.key"
        certificate_file = "/usr/local/etc/ssl-admin/active/wifiapname.crt"
        CA_file = "/usr/local/etc/ssl-admin/active/ca.crt"
        private_key_password = "ThisKeyMustMatchYourEAP.confFileOtherWiseItWontWork"
        dh_file = "/usr/local/etc/ssl-admin/dh4096.pem"
        random_file = "/dev/random"
        fragment_size = 1024
        include_length = yes
        check_crl = no
        cipher_list = "HIGH"
    verify {
        tmpdir = "/tmp/radiusd"
        client = "/usr/local/bin/openssl verify -CAfile /usr/local/etc/ssl-admin/active/ca.crt %{TLS-Client-Cert-Filename}"
    }
   }
 Module: Checking authorize {...} for more modules to load
 Module: Linked to module rlm_preprocess
 Module: Instantiating module "preprocess" from file /usr/local/etc/raddb/modules/preprocess
  preprocess {
        huntgroups = "/usr/local/etc/raddb/huntgroups"
        hints = "/usr/local/etc/raddb/hints"
        with_ascend_hack = no
        ascend_channels_per_line = 23
        with_ntdomain_hack = no
        with_specialix_jetstream_hack = no
        with_cisco_vsa_hack = no
        with_alvarion_vsa_hack = no
  }
reading pairlist file /usr/local/etc/raddb/huntgroups
reading pairlist file /usr/local/etc/raddb/hints
 Module: Linked to module rlm_detail
 Module: Instantiating module "auth_log" from file /usr/local/etc/raddb/modules/detail.log
  detail auth_log {
        detailfile = "/var/log/radacct/%{%{Packet-Src-IP-Address}:-%{Packet-Src-IPv6-Address}}/auth-detail-%Y%m%d"
        header = "%t"
        detailperm = 384
        dirperm = 493
        locking = no
        log_packet_header = no
  }
 Module: Checking preacct {...} for more modules to load
 Module: Linked to module rlm_acct_unique
 Module: Instantiating module "acct_unique" from file /usr/local/etc/raddb/modules/acct_unique
  acct_unique {
        key = "User-Name, Acct-Session-Id, NAS-IP-Address, NAS-Identifier, NAS-Port"
  }
 Module: Linked to module rlm_realm
 Module: Instantiating module "suffix" from file /usr/local/etc/raddb/modules/realm
  realm suffix {
        format = "suffix"
        delimiter = "@"
        ignore_default = no
        ignore_null = no
  }
 Module: Linked to module rlm_files
 Module: Instantiating module "files" from file /usr/local/etc/raddb/modules/files
  files {
        usersfile = "/usr/local/etc/raddb/users"
        acctusersfile = "/usr/local/etc/raddb/acct_users"
        preproxy_usersfile = "/usr/local/etc/raddb/preproxy_users"
        compat = "no"
  }
reading pairlist file /usr/local/etc/raddb/users
reading pairlist file /usr/local/etc/raddb/acct_users
reading pairlist file /usr/local/etc/raddb/preproxy_users
 Module: Checking session {...} for more modules to load
 Module: Linked to module rlm_radutmp
 Module: Instantiating module "radutmp" from file /usr/local/etc/raddb/modules/radutmp
  radutmp {
        filename = "/var/log/radutmp"
        username = "%{User-Name}"
        case_sensitive = yes
        check_with_nas = yes
        perm = 384
        callerid = yes
  }
 Module: Checking post-auth {...} for more modules to load
 Module: Linked to module rlm_attr_filter
 Module: Instantiating module "attr_filter.access_reject" from file /usr/local/etc/raddb/modules/attr_filter
  attr_filter attr_filter.access_reject {
        attrsfile = "/usr/local/etc/raddb/attrs.access_reject"
        key = "%{User-Name}"
        relaxed = no
  }
reading pairlist file /usr/local/etc/raddb/attrs.access_reject
 } # modules
} # server
radiusd: #### Opening IP addresses and Ports ####
listen {
        type = "auth"
        ipaddr = 10.0.0.254
        port = 0
}
Listening on authentication address 10.0.0.254 port 1812
Ready to process requests.
This last line is the most important. If you see this, you have a running radius authentication server. At this point, all the configuration files are probably correct.
Configuring an OS X client
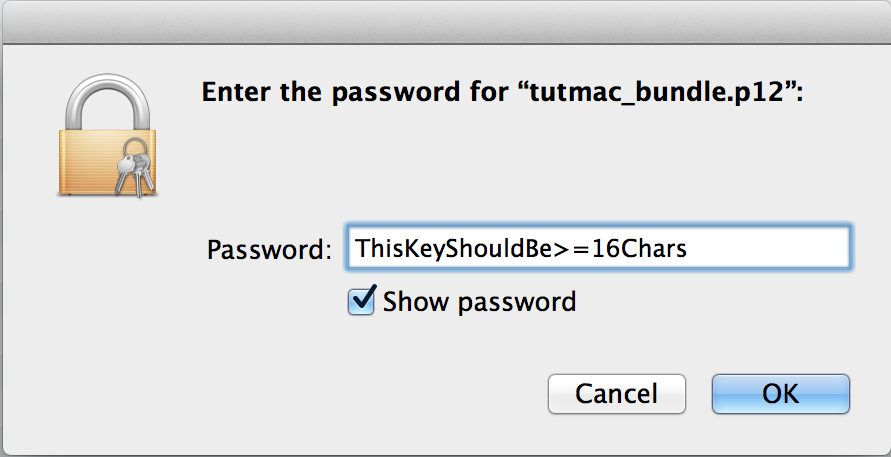
You’ll need to transfer the certification files to a USB device to install them on the OS X client. You’ll need /usr/local/etc/ssl-admin/tutmac_bundle.p12 and /usr/local/etc/ssl-admin/active/ca.crt. And you’ll also need the password for the tutmac private key. That private key is now bundled with the public key in the .p12 file above; we used openssl directly to convert that file just after creating the certificate.
The first you’ll need to install is the CA public certificate (ca.crt) this is done by double clicking the file. A prompt will come up similar to the one below. Make sure to select System.

After you click add you’ll need to Always Trust this CA
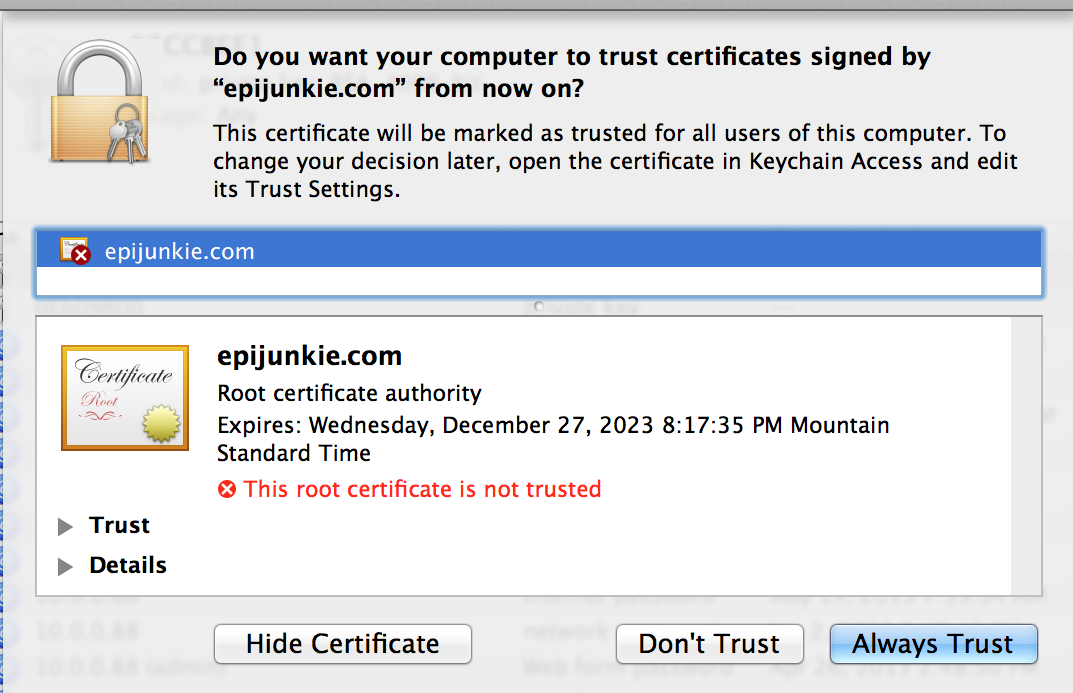
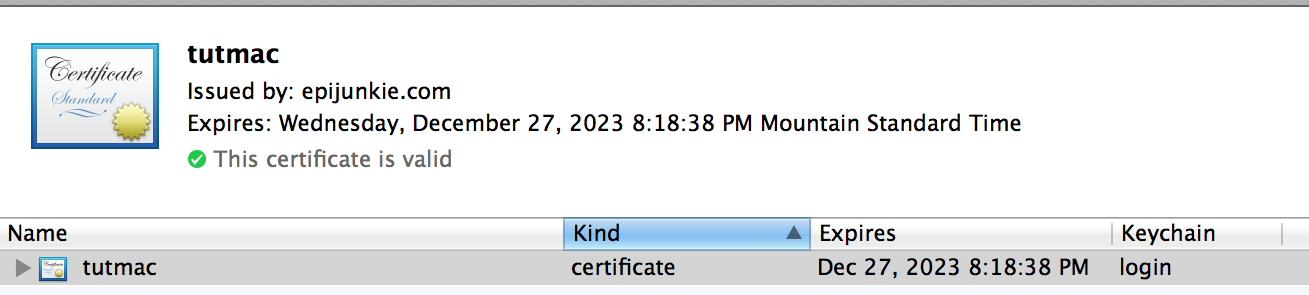
After it’s imported you can check it’s status with the Keychain Access application under Utilities, it should show the newly imported and trusted CA.

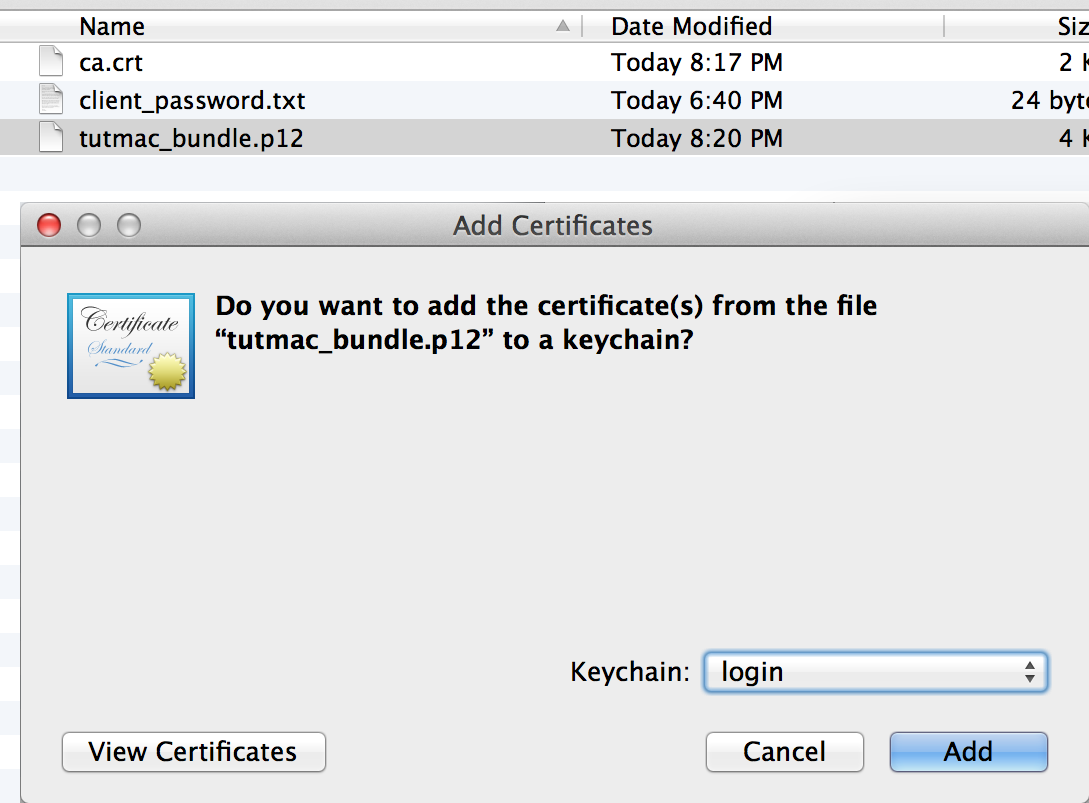
Next import the key bundle (both private and public keys for client.) The reason you need both is so the client can hand out the public key to the authentication server when initializing the connection. Make sure to select login before adding.
You will be prompted for the password to access the private key.
You won’t be prompted to trust these bundled certificates because the CA is already trusted on the system, so by premise these are trusted.
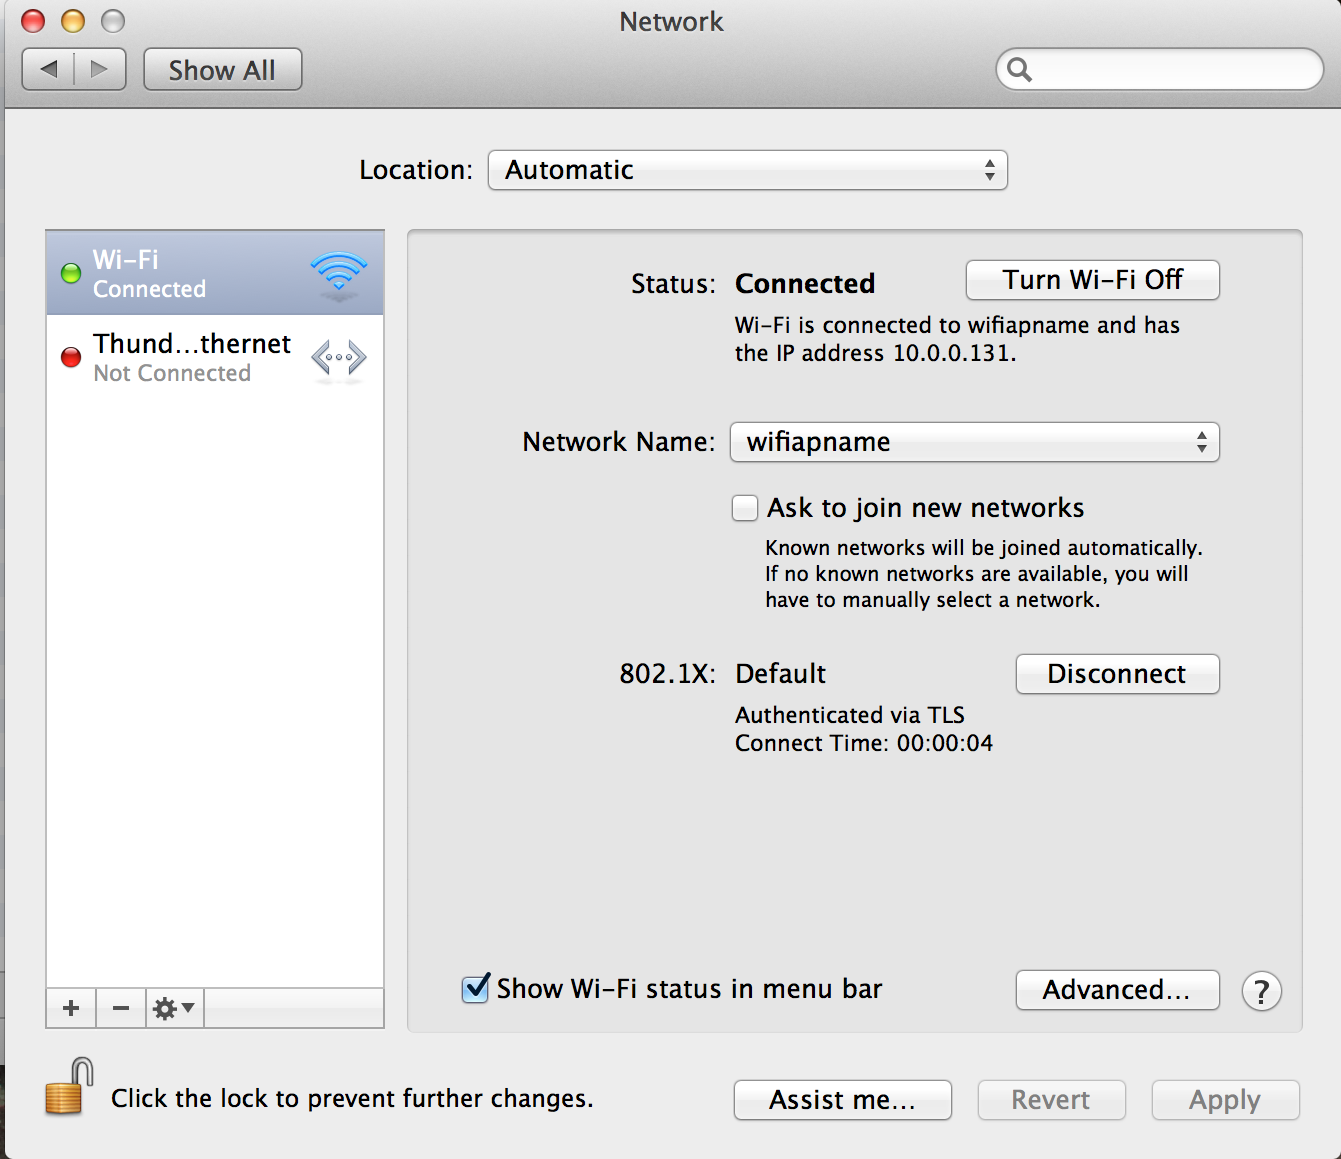
Now we can open System Preferences > Network and connect to the AP
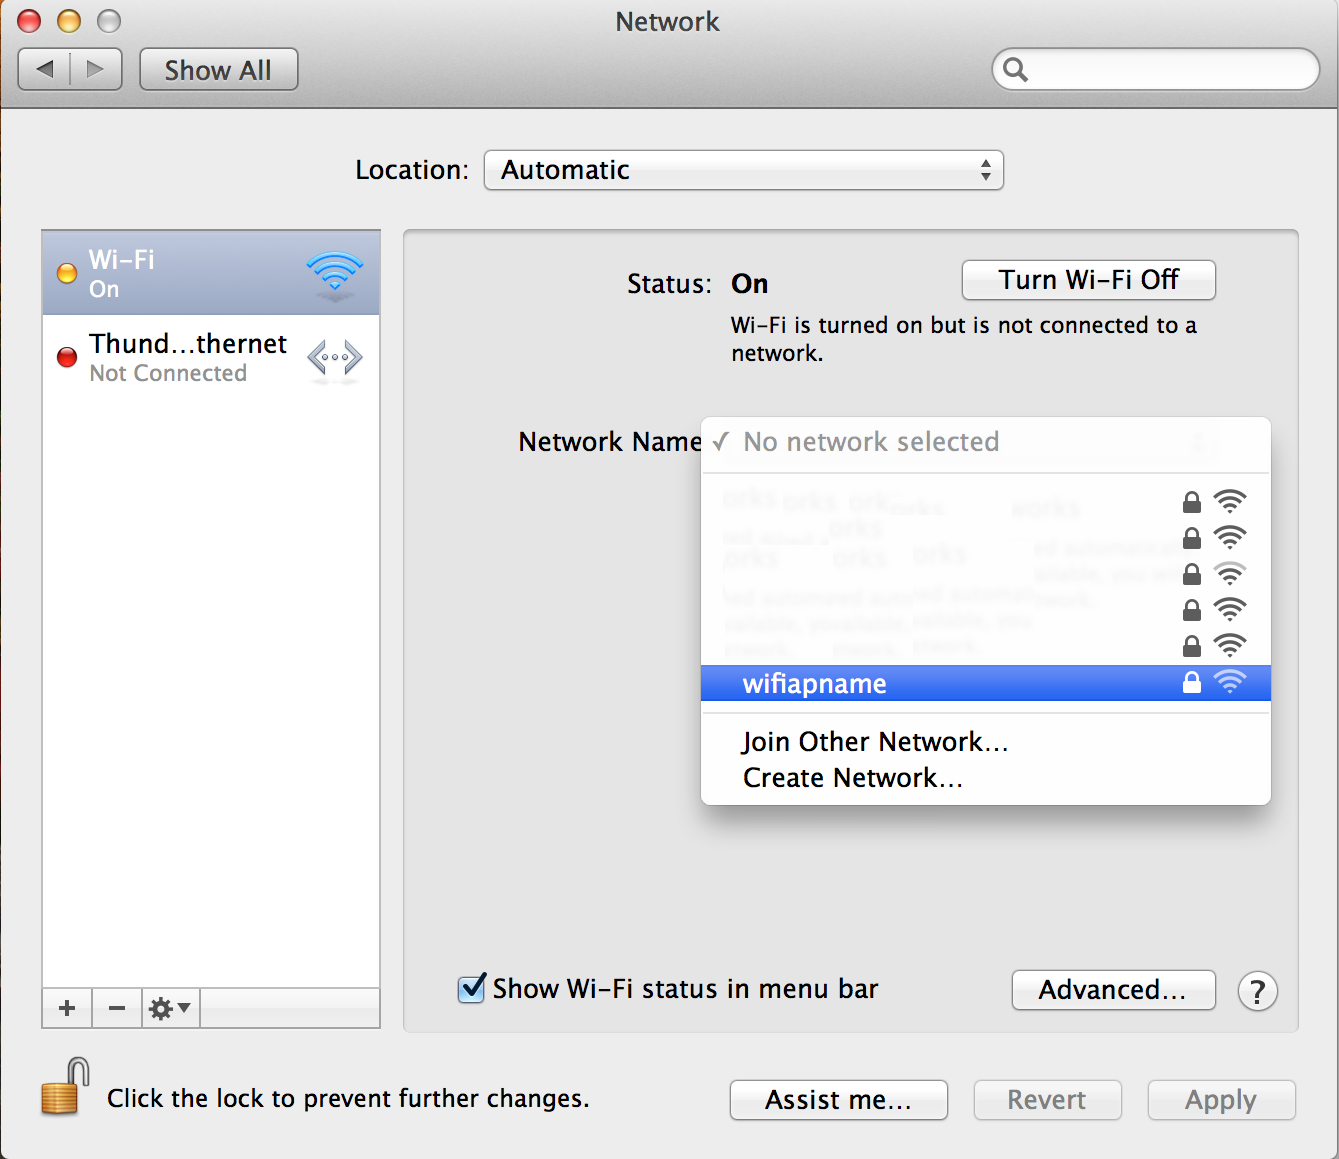
In the drop down menu for Mode select EAP-TLS, under Identify select the certificate tutmac, and under Username put the Owner name as prompted by the ssl-admin utility in this case tutmac. Also I’d suggest to check Remember this network and Always Allow using the credentials selected.
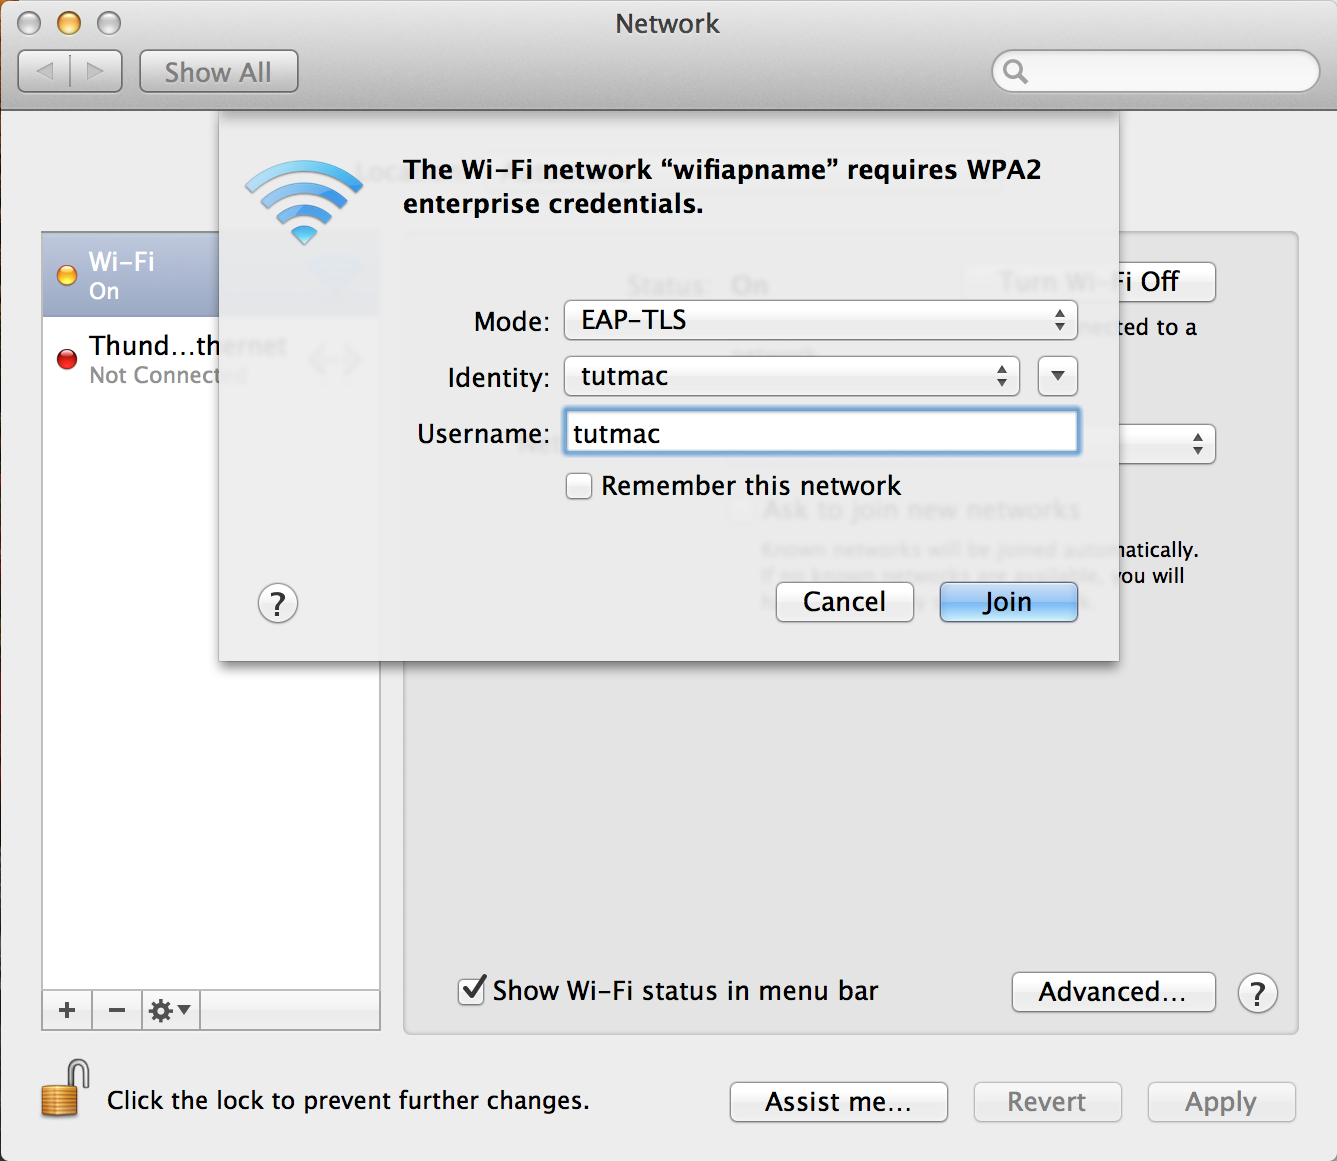
You’re now connected!
If you switch over to your terminal with the radiusd -X still running in debug mode you should get something like this:
...
<Lines Pruned>
...
[tls] eaptls_verify returned 3
[tls] eaptls_process returned 3
[tls] Adding user data to cached session
[eap] Freeing handler
++[eap] = ok
+} # group authenticate = ok
Login OK: [tutmac] (from client wifiapname port 1 cli 20-C9-D0-00-00-00)
# Executing section post-auth from file /usr/local/etc/raddb/sites-enabled/wifia
pname
+group post-auth {
++[exec] = noop
+} # group post-auth = noop
Sending Access-Accept of id 149 to 10.0.0.2 port 43734
        MS-MPPE-Recv-Key = 0xb2a059c817c2154e7d98b687f60fbd6e4bc570f0677271636502e84a662088e8
        MS-MPPE-Send-Key = 0x559487ef5297f942794561c1177f5b3c0d4e5e8fc782ca181afc681444447ce1
        EAP-Message = 0x03e60004
        Message-Authenticator = 0x00000000000000000000000000000000
        User-Name = "tutmac"
Finished request 10.
Going to the next request
Waking up in 2.0 seconds.
Cleaning up request 0 ID 139 with timestamp +23
Cleaning up request 1 ID 140 with timestamp +24
Cleaning up request 2 ID 141 with timestamp +24
Cleaning up request 3 ID 142 with timestamp +24
Cleaning up request 4 ID 143 with timestamp +24
Cleaning up request 5 ID 144 with timestamp +24
Waking up in 2.8 seconds.
Cleaning up request 6 ID 145 with timestamp +26
Cleaning up request 7 ID 146 with timestamp +26
Cleaning up request 8 ID 147 with timestamp +26
Cleaning up request 9 ID 148 with timestamp +26
Cleaning up request 10 ID 149 with timestamp +26
Ready to process requests.
Configuring an Android client
First you’ll need to copy the /usr/local/etc/ssl-admin/tutandroid_android.p12 file to the root of the internal SD card. Depending on which version of Android the device uses will determine the method you’ll use to do this. But for starters you’ll probably want to connect the USB cable to the port. Typically a notification will show up top telling you how to proceed. After that you’ll need to secure the device in some way because it’s storage device will need protection to keep the private key safe. Android will prompt you if the method you’re using on the device is insufficient.
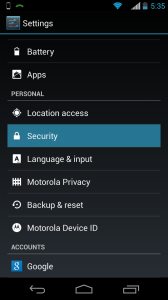
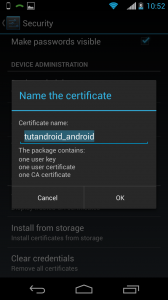
Then you’ll need to install the certificate; you’ll do this by going to Settings > Security > Install from storage:

You’ll then be prompted to type in the password for the Android private key (rememberthiskeywillbetypein).
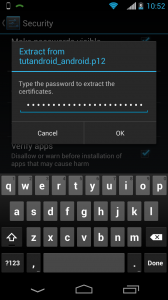
You’ll then be prompted to give the certificates a name, I use the default with no issue. You might notice that three certificates are being installed here, this .p12 was bundled with the CA certificate as well as the public and private keys for the client.
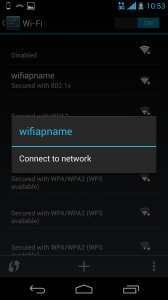
You can now connect to the network.
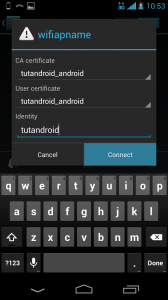
Select the certificates and type in the Owner name as prompted by the ssl-admin utility, in this case tutandroid.
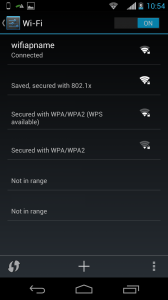
Tada!
If you switch over to your terminal with the radiusd -X still running in debug mode you should get something like this:
...
<Lines Pruned>
...
[eap] Request found, released from the list
[eap] EAP/tls
[eap] processing type tls
[tls] Authenticate
[tls] processing EAP-TLS
[tls] Received TLS ACK
[tls] ACK handshake is finished
[tls] eaptls_verify returned 3
[tls] eaptls_process returned 3
[tls] Adding user data to cached session
[eap] Freeing handler
++[eap] = ok
+} # group authenticate = ok
Login OK: [tutandroid] (from client wifiapname port 1 cli 60-BE-B5-00-00-00)
# Executing section post-auth from file /usr/local/etc/raddb/sites-enabled/wifiapname
+group post-auth {
++[exec] = noop
+} # group post-auth = noop
Sending Access-Accept of id 187 to 10.0.0.2 port 43734
        MS-MPPE-Recv-Key = 0x5e0b565b73c734b067ab090c21cff2ec11a3e0186f5f217d097fa1c5ae213e59
        MS-MPPE-Send-Key = 0xcb5989c431316692ae4d6e083393281a40f32829116113c940e0772c7b77e0a3
        EAP-Message = 0x03b30004
        Message-Authenticator = 0x00000000000000000000000000000000
        User-Name = "tutandroid"
Finished request 37.
Going to the next request
Waking up in 4.6 seconds.
Cleaning up request 28 ID 178 with timestamp +5011
Cleaning up request 29 ID 179 with timestamp +5011
Cleaning up request 30 ID 180 with timestamp +5011
Cleaning up request 31 ID 181 with timestamp +5011
Cleaning up request 32 ID 182 with timestamp +5011
Cleaning up request 33 ID 183 with timestamp +5011
Waking up in 0.2 seconds.
Cleaning up request 34 ID 184 with timestamp +5011
Cleaning up request 35 ID 185 with timestamp +5011
Cleaning up request 36 ID 186 with timestamp +5011
Cleaning up request 37 ID 187 with timestamp +5011
Ready to process requests.
At this point you can safely assume that the certificates work as does the daemon. You can can terminate the debug mode of radiusd by sending an SIGINT with Ctrl + C.
You can now start the daemon manually by using this command:
# /usr/local/etc/rc.d/radiusd start
Starting radiusd.
If you want to enable freeradius to start on boot run this once:
# echo 'radiusd_enable="YES"' >> /etc/rc.conf
This simple command appends the line radiusd_enable="YES" to the file rc.conf in /etc.
TLDR
We first started this by installing FreeBSD to some machine. We configured FreeBSD with a manual IP address and made sure to install the ports tree on installation. Once FreeBSD booted, we updated the time and installed freeradius2 from the ports tree. We then configured freeradius2, pruning insecure modules in the configuration files and further editing the files to reflect our environment. We then installed ssl-admin from the ports tree and configured it. We created a self-signed Certificate Authority, a server certificate, and two client certificates. We then finished the configuration of freeradius2 by updating the eap.conf file with the correct certificate file names and paths. Then we deleted the unnecessary modules for freeradius2 and fixed the permissions of the files for freeradius2 and ssl-admin. Some of the permission we set limited access solely to the user freeradius, the user name which the daemon is ran. We then configured the the wireless access point to send authentication request to the appropriate authentication server’s IP and port using the correct password. We then started the freeradius2 daemon in debug mode so that we could see any errors in the terminal. We then configured the OS X and Android clients and connected them to the network. Both were successful, we then terminated the daemon running in debug mode and started the client from the rc.d file. Also we configured the freeradius2 daemon to start on boot by editing the rc.conf.
Where to go from here
From here I would suggest looking into locking down FreeBSD. I’d first start by creating a firewall; only allowing traffic to ntp.org, the access point, and one PC for ssh access. I also would turn off root access via ssh. I would disable logins with the freeradius user account to further protect the private key files of which only root and freeradius have access to. I’d also suggest backing up the certificates to an offline encrypted storage device.
Even though it’s not covered in this guide, it’s possible to honor certificate revocation with freeradius2 and also to deauthenticating users currently connected to the network who’s certs were just revoked without power cycling the AP.
There are two more considerations for this setup I’d consider. One, would be to consider installing FreeBSD onto a Raspberry Pi and piggy back the rPi onto the AP. Many APs have USB ports which could supply power and even more APs have mounting slots which would make it simple to attach the rPi to the AP. The other consideration is, using FreeBSD 10.0 (currently at RC3) which out of the box supports GELI encryption under a ZFS rpool install.
Sources
In addition to all the links above, I’d suggest reading the various links below as well. I have used most of these links during my implementation; some were read after I got it working to further my own knowledge.
Wifi Cracking
- SG :: How To Crack WEP and WPA Wireless Networks
- AirCrack-NG.org – Tutorial: How to Crack WPA/WPA2
- coWPAtty – Attacking WPA/WPA2-PSK Exchanges
- Tom’s Hardware – Harden Up: Can We Break Your Password With Our GPUs?
- Tom’s Hardware – Wi-Fi Security: Cracking WPA With CPUs, GPUs, And The Cloud
WPA2 PSK
- Wikipedia.org – IEEE 802.11i-2004 – The Four-Way Handshake
- Pyrit – The twilight of Wi-Fi Protected Access
- Tech Net – The Cable Guy – Wi-Fi Protected Access Data Encryption and Integrity
EAP-TLS
- Area536.com – The toughest WiFi on the block
- A Threat Analysis of The Extensible Authentication Protocol by Lei Han on April, 2006 at Carleton University
- Cubic – Setting up WPA2-Enterprise + AES with Ubuntu 12.04.2 + FreeRADIUS with EAP-TLS only
Certificates
- SSL: Who do you trust?
- Validating a Certificate Path with OpenSSL
- Dan Langille’s Other Diary – ssl-admin
- Sébastien Wains – Importing certificates on Android (CA and client)
RFCs
- RFC-5216 – EAP-TLS
- RFC 3748 – Extensible Authentication Protocol
- RFC 5280 – X.509 PKI and CRL
- IEEE 802.1X-2010
- man ssl-admin
Direct Quotes
Versions used
I include this section in case you have any problems and can’t seem to get around them. You can source down these versions and try it from that basis.
- FreeBSD 9.2 AMD64
- OpenSSL 0.9.8y 5 Feb 2013
- FreeRADIUS 2.2.0
- gmake-3.82_1
- autoconf-2.69
- libtool-2.4.2_2
- gdbm-1.10
- libltdl-2.4.2_2
- perl5-5.16.3_4
- m4-1.4.17,1
- help2man-1.43.3_1
- autoconf-wrapper-20131203
- zip-3.0
- ssl-admin-1.1.0
- DD-WRT v24-sp2 (07/24/13) std – build 22118