Raspberry Pi + Arch Linux + FDE + FreeRADIUS3, A low power RADIUS server for WPA2 Enterprise
Updated: 20140523 – Please update the initrd image after kernel updates. See below for more information.
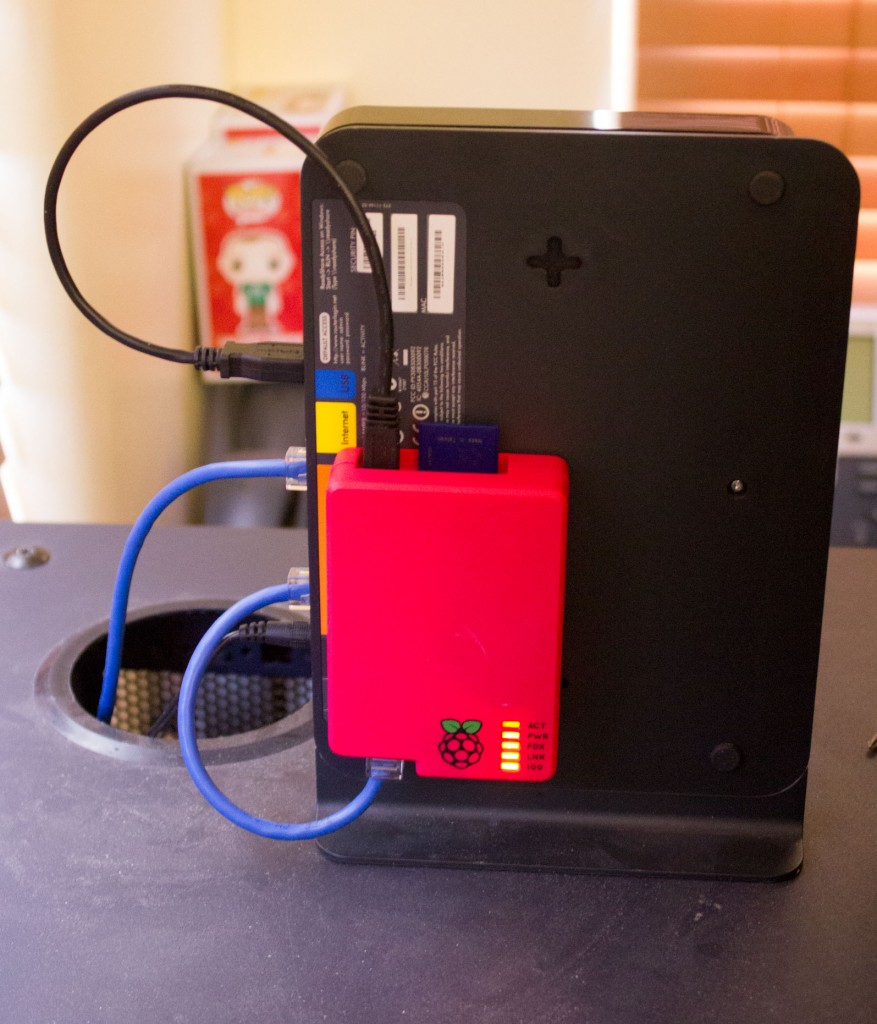
Table of contents
- Background
- What is this post about?
- How To
- Security Considerations
- Sources
- Thanks To
Background
I recently finished up my article for getting a RADIUS server running for the purpose of authenticating WPA2 Enterprise wireless clients. That setup works great, the problem is if I bring my ESXi host down, my RADIUS server goes offline; effectively bringing down my wireless. I wanted an elegant solution around this, enter the Raspberry Pi. The rPi is a low power device that can run a full fledged OS and is powered via a USB port, my wireless access point conveniently has an unused USB port.
What is this post about?
This guide explains how to get RADIUS server running on a Raspberry Pi (rPi) using Arch Linux on a nearly Full Disk Encryption (FDE) SD card. This RADIUS server is intended to be a backup server. This post assumes a RADIUS server is already setup as well as a Certificate Authority (CA) as described in my previous post.
How To
Installing Arch Linux
Download and flash the Arch Linux image
Download the install image from RaspberryPi.org or ArchLinuxArm.org. This is not a typical install, it simply writes an image to the SD card. The device’s hardware is static, so there are not any needed prompt for options during a typical installation. The assumption is you can configure items such as the hostname, time zone, etcetera later on.
Below is how to write the image from an OS X host. Writing this image from a Windows host is also possible and the procedure for writing from a Linux host will be nearly identical.
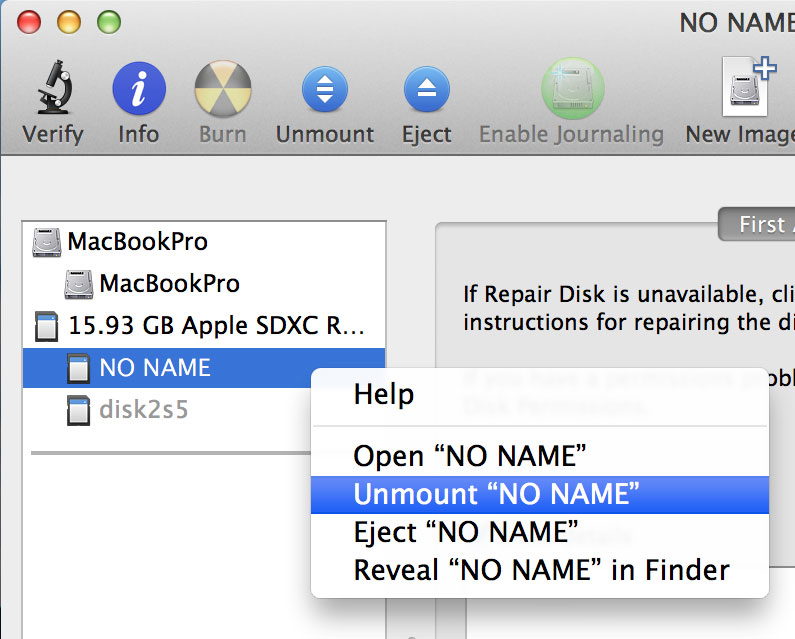
In the OS X Disk Utility, Unmount, do not Eject, all the mounted partitions on the SD card. This allows full access to dd without other applications trying to locking the device.
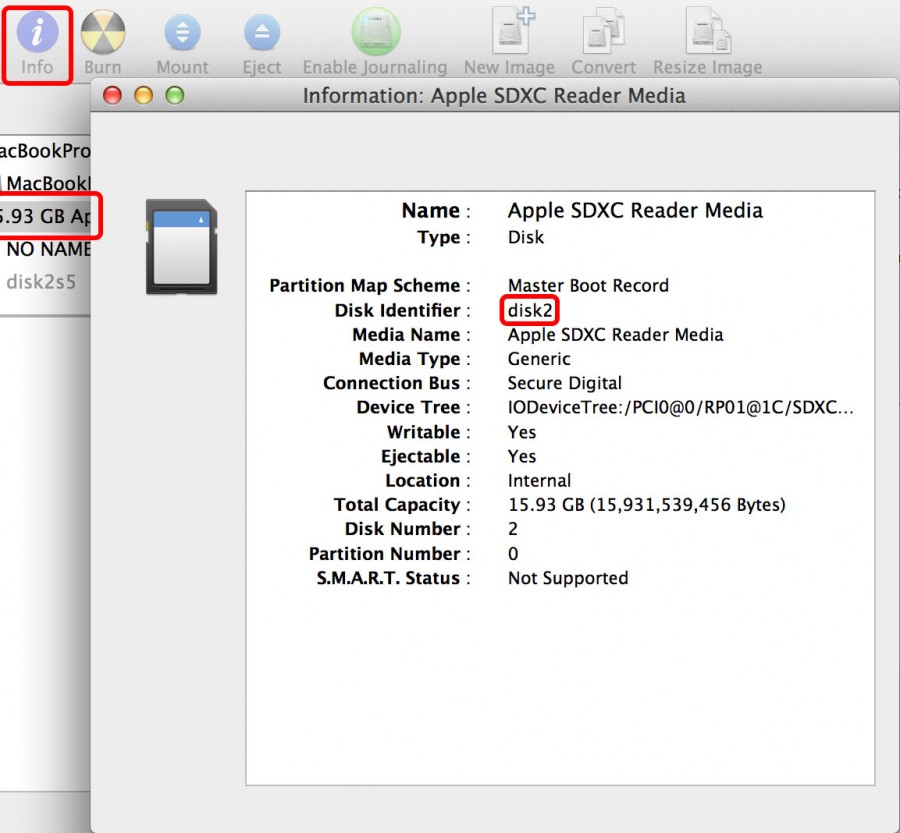
Then find out the device id to write to by selecting Info from the Disk Utility application after selecting the SD card you intend to format.
Use the dd command to write the image to the SD card. This will erase the entire SD card. Keep in mind the dd command is extremely destructive, make sure the correct input and output locations are used.
$ sudo dd bs=1m if=/Users/epijunkie/rpi/archlinux-hf-2013-11-14.img of=/dev/rdisk2
Password:
1870+0 records in
1870+0 records out
1960837120 bytes transferred in 58.268067 secs (33652002 bytes/sec)
As shown, it only took 58 seconds to write to a 16GB Class 10 SD card. Using rdisk instead of disk will perform faster writes on OS X. The r stands for raw, as in no buffering takes place. Using the bs=1m flag tells dd to write in 1MB chunks.
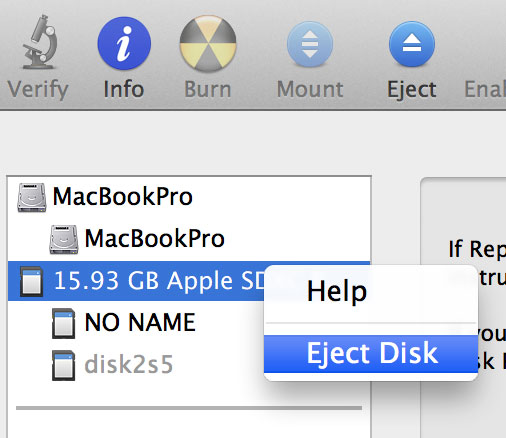
Eject the disk once the write is complete. The rPi is ready to boot Arch Linux.
Modify the base Arch Linux install
After about 30 seconds of the rPi running you should be able to run date and have the current correct time displayed. This is because ntpd will run and update the time from ntp.org but updating is not instant upon boot. I installed a rasclock to my rPi, which is a hardware real-time clock (RTC). I’d personally suggest a hardware RTC because without the correct time the certificates for the TLS connection won’t validate as they’ll be out of Validity window. I installed the rasclock to avoid the annoyance of having an inaccessible wireless network if say the power gets knocked out and something supplying my internet gets completely knocked offline, requiring my intervention to bring it back up. It’s always a lot of ifs until it happens.
It’s worth noting this guide is written so you can run the rPi completely headless relying on SSH to log into the machine. Log into the rPi via SSH as the root user.
$ ssh root@10.0.0.233
The authenticity of host '10.0.0.233 (10.0.0.233)' can't be established.
RSA key fingerprint is 64:ec:10:75:ec:53:52:ec:15:50:11:35:b6:86:c6:11.
Are you sure you want to continue connecting (yes/no)? yes
Warning: Permanently added '10.0.0.233' (RSA) to the list of known hosts.
root@10.0.0.233's password: root
‘root’ is the default password and can be changed by using the passwd command once logged on.
A static IP is needed for this install. So first we’ll disable the dhcp client service and set a hostname.
# systemctl stop dhcpcd.service
# hostnamectl set-hostname prefderpi
To set a static IP on the eth0 interface, edit the /etc/netctl/eth0 file to reflect a configuration similar to this this:
Description='A basic static ethernet connection'
Interface=eth0
Connection=ethernet
IP=static
Address=('10.0.0.253/24')
Gateway='10.0.0.1'
DNS=('10.0.0.1')
Then you’ll want to edit your /etc/resolv.conf with your DNS servers:
nameserver 10.0.0.1
nameserver 208.67.220.220
nameserver 208.67.222.222
search epijunkie.com
Lines 2 and 3 indicate the name servers for OpenDNS. Three is the maximum number of settable name servers on Arch Linux. After a quick reboot the rPi will start using the new IP address and hostname. At this point pinging should be possible google.com
Next, update the package manager and update the base system install:
# pacman -Syu
:: Synchronizing package databases...
core 44.5 KiB 303K/s 00:00 [##########################################] 100%
extra 550.9 KiB 673K/s 00:01 [##########################################] 100%
community 591.6 KiB 1565K/s 00:00 [##########################################] 100%
alarm 7.8 KiB 7.58M/s 00:00 [##########################################] 100%
aur 20.6 KiB 10.1M/s 00:00 [##########################################] 100%
:: Starting full system upgrade...
:: Replace sysvinit-tools with core/procps-ng? [Y/n] Y
resolving dependencies...
looking for inter-conflicts...

Packages (47): coreutils-8.22-2 cronie-1.4.11-1 cryptsetup-1.6.3-1 curl-7.34.0-2 dbus-1.6.18-3 device-mapper-2.02.104-1
dhcpcd-6.1.0-1.1 file-5.16-1 glib2-2.38.2-1 grep-2.16-1 haveged-1.8-1 hwids-20130915.1-1
iana-etc-2.30-4 inetutils-1.9.1.341-2 iproute2-3.11.0-1 iptables-1.4.20-1 kbd-2.0.1-1 kmod-16-1
krb5-1.11.4-1 libcap-2.24-1 libdbus-1.6.18-3 libldap-2.4.38-1 libnl-3.2.23-1 libpipeline-1.2.6-1
linux-api-headers-3.12.4-1 linux-raspberrypi-3.10.25-2 lvm2-2.02.104-1 man-pages-3.55-1 mpfr-3.1.2.p5-1
netctl-1.4-2 ntp-4.2.6.p5-18 openssl-1.0.1.f-1 pacman-4.1.2-5 pacman-mirrorlist-20140107-1 pcre-8.34-1
procps-ng-3.3.9-1 raspberrypi-firmware-bootloader-20140109-1 raspberrypi-firmware-bootloader-x-20140109-1
raspberrypi-firmware-emergency-kernel-20140109-1 raspberrypi-firmware-tools-20140109-1 s-nail-14.5.1-1
systemd-208-3 systemd-sysvcompat-208-3 sysvinit-tools-2.88-12 [removal] tar-1.27.1-1 tzdata-2013i-1
util-linux-2.24-2

Total Download Size: 52.73 MiB
Total Installed Size: 141.39 MiB
Net Upgrade Size: 0.89 MiB

:: Proceed with installation? [Y/n] Y
:: Retrieving packages ...
libcap-2.24-1-armv6h 35.2 KiB 269K/s 00:00 [##########################################] 100%
openssl-1.0.1.f-1-armv6h 2.1 MiB 1316K/s 00:02 [##########################################] 100%
coreutils-8.22-2-armv6h 1967.3 KiB 3.29M/s 00:01 [##########################################] 100%
cronie-1.4.11-1-armv6h 54.8 KiB 5.95M/s 00:00 [##########################################] 100%
libdbus-1.6.18-3-armv6h 108.5 KiB 8.83M/s 00:00 [##########################################] 100%
<Lines Pruned>
Install the packages need for this guide:
# pacman -S rsync mkinitcpio dropbear freeradius base-devel yaourt
:: There are 25 members in group base-devel:
:: Repository core
1) autoconf 2) automake 3) binutils 4) bison 5) fakeroot 6) file 7) findutils 8) flex 9) gawk 10) gcc
11) gettext 12) grep 13) groff 14) gzip 15) libtool 16) m4 17) make 18) pacman 19) patch 20) pkg-config 21) sed
22) sudo 23) texinfo 24) util-linux 25) which

Enter a selection (default=all): <Enter>
warning: file-5.16-1 is up to date -- reinstalling
warning: findutils-4.4.2-5 is up to date -- reinstalling
warning: gawk-4.1.0-2 is up to date -- reinstalling
warning: gettext-0.18.3.1-2 is up to date -- reinstalling
warning: grep-2.16-1 is up to date -- reinstalling
warning: groff-1.22.2-5 is up to date -- reinstalling
warning: gzip-1.6-1 is up to date -- reinstalling
warning: pacman-4.1.2-5 is up to date -- reinstalling
warning: sed-4.2.2-3 is up to date -- reinstalling
warning: texinfo-5.2-2 is up to date -- reinstalling
warning: util-linux-2.24-2 is up to date -- reinstalling
warning: which-2.20-6 is up to date -- reinstalling
resolving dependencies...
looking for inter-conflicts...

Packages (46): cloog-0.18.0-2 gc-7.2.d-2 guile-2.0.9-1 isl-0.11.1-1 libaio-0.3.109-7 libltdl-2.4.2-7
libmariadbclient-5.5.34-3 libmpc-1.0.1-2 mkinitcpio-busybox-1.21.1-2 net-snmp-5.7.2-8 package-query-1.2-2
postgresql-libs-9.3.2-4 ppl-1.0-1 talloc-2.0.8-2 yajl-2.0.4-2 autoconf-2.69-1 automake-1.14.1-1
binutils-2.23.1-3 bison-3.0.2-1 dropbear-2013.62-1 fakeroot-1.20-1 file-5.16-1 findutils-4.4.2-5
flex-2.5.37-1 freeradius-3.0.0-1 gawk-4.1.0-2 gcc-4.7.2-4 gettext-0.18.3.1-2 grep-2.16-1 groff-1.22.2-5
gzip-1.6-1 libtool-2.4.2-7 m4-1.4.17-1 make-4.0-2 mkinitcpio-16-2 openssl-1.0.1.f-1 pacman-4.1.2-5
patch-2.7.1-2 pkg-config-0.28-1 rsync-3.1.0-1 sed-4.2.2-3 sudo-1.8.8-1 texinfo-5.2-2 util-linux-2.24-2
which-2.20-6 yaourt-1.3-1

Total Download Size: 43.51 MiB
Total Installed Size: 228.44 MiB
Net Upgrade Size: 180.58 MiB

:: Proceed with installation? [Y/n] Y
:: Retrieving packages ...
gawk-4.1.0-2-armv6h 839.7 KiB 976K/s 00:01 [##########################################] 100%
mkinitcpio-busybox-1.21.1-2-armv6h 145.0 KiB 10.9M/s 00:00 [##########################################] 100%
findutils-4.4.2-5-armv6h 319.0 KiB 2.40M/s 00:00 [##########################################] 100%
gzip-1.6-1-armv6h 70.5 KiB 13.8M/s 00:00 [##########################################] 100%
<Lines Pruned>
Install the pre-boot ssh daemon
This installs the dropbear_initrd_encrypt package from source using yaourt. This allows for a ssh connection before the FDE password is entered; allowing for a completely headless install through reboots while maintaining the full disk encryption.
# yaourt -S dropbear_initrd_encrypt
==> Downloading dropbear_initrd_encrypt PKGBUILD from AUR...
x dropbear_install
x dropbear_hook
x encryptssh_hook
x PKGBUILD
x dropbear_initrd_encrypt.install
x ChangeLog
x encryptssh_install

<Lines Omitted>
dropbear_initrd_encrypt 0.12-1 (Sun Oct 11 14:44:09 MDT 2009)
( Unsupported package: Potentially dangerous ! )
==> Edit PKGBUILD ? [Y/n] ("A" to abort)
==> ------------------------------------
==> n

==> dropbear_initrd_encrypt dependencies:
- dropbear (already installed)
- cryptsetup (already installed)
- psmisc (already installed)
- iproute2 (already installed)
- mkinitcpio-nfs-utils (package found)
==> Edit dropbear_initrd_encrypt.install ? [Y/n] ("A" to abort)
==> -----------------------------------------------------------
==> n

==> Continue building dropbear_initrd_encrypt ? [Y/n] Y
==> -------------------------------------------------
==>
==> Building and installing package
==> Install or build missing dependencies for dropbear_initrd_encrypt:
resolving dependencies...
looking for inter-conflicts...

Packages (1): mkinitcpio-nfs-utils-0.3-4

Total Download Size: 0.01 MiB
Total Installed Size: 0.07 MiB

:: Proceed with installation? [Y/n] Y
:: Retrieving packages ...
mkinitcpio-nfs-utils-0.3-4-armv6h 14.6 KiB 187K/s 00:00 [##########################################] 100%
(1/1) checking keys in keyring [##########################################] 100%
(1/1) checking package integrity [##########################################] 100%
(1/1) loading package files [##########################################] 100%
(1/1) checking for file conflicts [##########################################] 100%
(1/1) checking available disk space [##########################################] 100%
(1/1) installing mkinitcpio-nfs-utils [##########################################] 100%
==> WARNING: Building package as root is dangerous.
Please run yaourt as a non-privileged user.
==> Making package: dropbear_initrd_encrypt 0.12-1 (Sat Jan 11 16:16:40 MST 2014)
==> WARNING: Using a PKGBUILD without a package() function is deprecated.
==> Checking runtime dependencies...
==> Checking buildtime dependencies...
==> Retrieving sources...
-> Found ChangeLog
-> Found dropbear_hook
-> Found dropbear_install
-> Found encryptssh_hook
-> Found encryptssh_install
-> Found dropbear_initrd_encrypt.install
==> Validating source files with md5sums...
ChangeLog ... Passed
dropbear_hook ... Passed
dropbear_install ... Passed
encryptssh_hook ... Passed
encryptssh_install ... Passed
dropbear_initrd_encrypt.install ... Passed
==> Extracting sources...
==> Starting build()...
==> Tidying install...
-> Purging unwanted files...
-> Removing libtool files...
-> Removing static library files...
-> Compressing man and info pages...
-> Stripping unneeded symbols from binaries and libraries...
==> Creating package "dropbear_initrd_encrypt"...
-> Generating .PKGINFO file...
-> Adding changelog file...
-> Adding install file...
-> Generating .MTREE file...
-> Compressing package...
==> Finished making: dropbear_initrd_encrypt 0.12-1 (Sat Jan 11 16:16:44 MST 2014)

==> Continue installing dropbear_initrd_encrypt ? [Y/n]
==> [v]iew package contents [c]heck package with namcap
==> ---------------------------------------------------
==> y

loading packages...
resolving dependencies...
looking for inter-conflicts...

Packages (1): dropbear_initrd_encrypt-0.12-1

Total Installed Size: 0.01 MiB

:: Proceed with installation? [Y/n] y
(1/1) checking keys in keyring [##########################################] 100%
(1/1) checking package integrity [##########################################] 100%
(1/1) loading package files [##########################################] 100%
(1/1) checking for file conflicts [##########################################] 100%
(1/1) checking available disk space [##########################################] 100%
(1/1) installing dropbear_initrd_encrypt [##########################################] 100%
Insert your SSH public key into "/etc/dropbear/root_key", e.g. using
"cat ~/.ssh/id_rsa.pub > /etc/dropbear/root_key". Add the "ip=" kernel
command parameter to your bootloader configuration with the appropriate
arguments (see https://wiki.archlinux.org/index.php/Mkinitcpio#Using_net).

Afterwards add the "dropbear encryptssh" hooks before "filesystems" within
the "HOOKS" array in "/etc/mkinitcpio.conf". Finally rebuild the initramsfs
("mkinitcpio -p linux").
Prepare the partition
Using fdisk prepare the SD for the encrypted partition. Delete the 5th partition and create a new primary partition as the 3rd.
# fdisk /dev/mmcblk0

Welcome to fdisk (util-linux 2.24).
Changes will remain in memory only, until you decide to write them.
Be careful before using the write command.
Command (m for help): p
Disk /dev/mmcblk0: 14.9 GiB, 15931539456 bytes, 31116288 sectors
Units: sectors of 1 * 512 = 512 bytes
Sector size (logical/physical): 512 bytes / 512 bytes
I/O size (minimum/optimal): 512 bytes / 512 bytes
Disklabel type: dos
Disk identifier: 0x417ee54b

Device Boot Start End Blocks Id System
/dev/mmcblk0p1 2048 186367 92160 c W95 FAT32 (LBA)
/dev/mmcblk0p2 186368 3667967 1740800 5 Extended
/dev/mmcblk0p5 188416 3667967 1739776 83 Linux

Command (m for help): d
Partition number (1,2,5, default 5): 5

Partition 5 has been deleted.

Command (m for help): n

Partition type:
p primary (1 primary, 1 extended, 2 free)
l logical (numbered from 5)
Select (default p): p
Partition number (3,4, default 3): 3
First sector (3667968-31116287, default 3667968):
Last sector, +sectors or +size{K,M,G,T,P} (3667968-31116287, default 31116287):

Created a new partition 3 of type 'Linux' and of size 13.1 GiB.

Command (m for help): w
The partition table has been altered.
Calling ioctl() to re-read partition table.
Re-reading the partition table failed.: Device or resource busy

The kernel still uses the old table. The new table will be used at the next reboot or after you run partprobe(8) or kpartx(8).
Reboot to let the kernel load the new partition table.
Prepare the FDE volume
For basic security, zero out the newly create partition, then use LUKS to create a map to the encrypted volume using the entire partition 3 on the SD card.
# dd if=/dev/zero of=/dev/mmcblk0p3 bs=1M
dd: error writing '/dev/mmcblk0p3': No space left on device
13403+0 records in
13402+0 records out
14053539840 bytes (14 GB) copied, 830.066 s, 16.9 MB/s

# cryptsetup -c aes-xts-plain -y -s 512 luksFormat /dev/mmcblk0p3
WARNING!
========
This will overwrite data on /dev/mmcblk0p3 irrevocably.

Are you sure? (Type uppercase yes): YES
Enter passphrase:
Verify passphrase:
Format the encrypted volume
Next the encrypted volume will be mapped using LUKS and then formatted using ext4. Then it can be system mounted to /mnt.
# cryptsetup luksOpen /dev/mmcblk0p3 root
Enter passphrase for /dev/mmcblk0p3:

# mkfs.ext4 /dev/mapper/root
mke2fs 1.42.8 (20-Jun-2013)
Filesystem label=
OS type: Linux
Block size=4096 (log=2)
Fragment size=4096 (log=2)
Stride=0 blocks, Stripe width=0 blocks
858480 inodes, 3430528 blocks
171526 blocks (5.00%) reserved for the super user
First data block=0
Maximum filesystem blocks=3514826752
105 block groups
32768 blocks per group, 32768 fragments per group
8176 inodes per group
Superblock backups stored on blocks:
32768, 98304, 163840, 229376, 294912, 819200, 884736, 1605632, 2654208

Allocating group tables: done
Writing inode tables: done
Creating journal (32768 blocks): done
Writing superblocks and filesystem accounting information: done

# mount /dev/mapper/root /mnt
Rsync System
Copy over the running Arch Linux system to the encrypted LUKS volume using rsync.
# rsync -ax / /mnt/
Using the --progress flag will show the progress in the terminal but at the expense of slowing down the transfer. From this point on, any files changed will need to be copied over to the new boot environment so that future initrd builds will be valid. The /boot folder is it’s own partition, so changes won’t need to be synced over. Edits done in /mnt/* are exclusive to the post FDE environment, such as the fstab which will be discussed below.
Update the hostname on the encrypted install.
# echo "postfderpi" > /mnt/etc/hostname
Append initramfs initrd 0x00f00000 to the end of the content of /boot/config.txt or run this:
# echo "initramfs initrd 0x00f00000" >> /boot/config.txt
Edit the encrypted volume’s fstab file to incorporate the new LUKS mapping for the root partition located at /mnt/etc/fstab .
5: /dev/mmcblk0p1      /boot       vfat    defaults                    0      0
6: /dev/mapper/root    /           ext4    defaults,commit=120,noatime 0      1
It is suggested to use tabs in-between the options above rather than spaces.
Add the ip=, cryptdevice=, and initrd= sections and modify the root= section to reflect the LUKS mapped device rather than the physical device in the /boot/cmdline.txt file.
1: ipv6.disable=1 ip=10.0.0.253::10.0.0.1:255.255.255.0:postfderpi:eth0:static avoid_safe_mode=1 selinux=0 plymouth.enable=0 smsc95xx.turbo_mode=N dwc_otg.lpm_enable=0 console=ttyAMA0,115200 kgdboc=ttyAMA0,115200 console=tty1 cryptdevice=/dev/mmcblk0p3:root: root=/dev/mapper/root initrd=0x00f00000 rootfstype=ext4 elevator=noop rootwait
For the explanation of the ip= section use this link. The bold sections are what needs to be added or modified to the original cmdline.txt
Edit in /etc/mkinitcpio.conf the HOOKS declaration to something like this:
52: HOOKS="base udev autodetect modconf block keyboard dropbear encryptssh filesystems fsck"
From the standard Arch Linux install you’ll need to move keyboard to just after block and then add the dropbear and encryptssh.
Copy this file to the new encrypted install:
# cp /etc/mkinitcpio.conf /mnt/etc/mkinitcpio.conf
Setup the pre-boot sshd keys
The public key from the primary machine that will be used to SSH into the rPi to enter the FDE password in the pre-boot environment needs to be copied to /etc/dropbear/root_key file. The command below should work on most *nix based devices.
remote_user@remote_host$ scp .ssh/id_rsa.pub root@10.0.0.233:/etc/dropbear/root_key
Back on the rPi, we’ll use the dropbear key converter to convert the current openssh daemon’s keys to be used with the pre-boot dropbear daemon
# cd /etc/dropbear
# dropbearconvert openssh dropbear /etc/ssh/ssh_host_rsa_key dropbear_rsa_host_key
Key is a RSA key
Wrote key to '/etc/dropbear/dropbear_rsa_host_key'

# dropbearconvert openssh dropbear /etc/ssh/ssh_host_dsa_key dropbear_dss_host_key
Key is a DSS key
Wrote key to '/etc/dropbear/dropbear_dss_host_key'

# cp /etc/dropbear/* /mnt/etc/dropbear/
Build the initrd image
This tells mkinitcpio to build the initrd image for this particular kernel that’s running.
# uname -r
3.10.25-2-ARCH
Using the output string from above and enter into the command below.
# mkinitcpio -k 3.10.25-2-ARCH -g /boot/initrd
==> Starting build: 3.10.25-2-ARCH
-> Running build hook: [base]
-> Running build hook: [udev]
-> Running build hook: [autodetect]
-> Running build hook: [modconf]
-> Running build hook: [block]
-> Running build hook: [keyboard]
-> Running build hook: [dropbear]
dropbear_dss_host_key : md5 a4:6a:78:1d:52:d6:72:ae:b6:23:25:cc:1f:4c:6a:ba
dropbear_rsa_host_key : md5 64:ec:10:75:ec:53:52:ec:15:50:11:35:b6:86:c6:11
-> Running build hook: [encryptssh]
-> Running build hook: [filesystems]
-> Running build hook: [fsck]
==> Generating module dependencies
==> Creating gzip initcpio image: /boot/initrd
==> Image generation successful
Updated: 20140623. Please note that building this initrd image ties the image to the particular version of the kernel. Updating the kernel will invalidate the initrd image, so rebuilding the initrd is required and only requires that you run the command below after any kernel updates.
mkinitcpio -k `uname -r` -g /boot/initrd
Hope
At this point, we are at the moment of truth. We can now reboot, SSH as root to the IP used in /boot/cmdline.txt under the ip= section, and enter the FDE passphrase. Immediately the SSH connection will be dropped after hitting enter if a correct passphrase was used. After a minute or two, you should be able to SSH into the fully boot environment. If for some reason you can not SSH into the fully booted environment, directions likely were not followed, and you’ll need to undo edits to files in the /boot directory to boot the unencrypted install. You can modify the files on any machine simply by mounting the SD card on another system; the /boot partition is formatted with FAT16.
Configuring FreeRADIUS
With the 3.x series of FreeRADIUS the configuration syntax has slightly changes since version 2.x; not only that but the structure of the folders has also changed slightly.
Updated: 20160513. Thanks to “mkinitcpio” for the update. Apparently 3.0.11 of FreeRADIUS adds some sanity checks to the configuration file that breaks previous working configs, including the one below. See his post below.
Create server certificates
A new certificate will need to be created for this particular instance of FreeRADIUS. So you will need a Certificate Authority setup on a machine, a recent tutorial of mine went over how to set one up. You will need to log into the server and create the server certificate. In this guide were logging on to our previous example and creating another certificate using ssl-admin.
# ssl-admin
This program will walk you through requesting, signing,
organizing and revoking SSL certificates.

===> Creating initial CRL.Using configuration from /usr/local/etc/ssl-admin/open
ssl.conf
Enter pass phrase for /usr/local/etc/ssl-admin/active/ca.key: ThisShouldBeLongToo
ssl-admin installed Sun Dec 29 16:02:41 MST 2013
OPTIONAL: I can't find your OpenVPN client config.  Please copy your config to
/usr/local/etc/ssl-admin/packages/client.ovpn

=====================================================
#                  SSL-ADMIN                        #
=====================================================
Please enter the menu option from the following list:
1) Update run-time options:
     Key Duration (days): 3650
     Current Serial #: 01
     Key Size (bits): 4096
     Intermediate CA Signing: NO
2) Create new Certificate Request
3) Sign a Certificate Request
4) Perform a one-step request/sign
5) Revoke a Certificate
6) Renew/Re-sign a past Certificate Request
7) View current Certificate Revokation List
8) View index information for certificate.
i) Generate a user config with in-line certifcates and keys.
z) Zip files for end user.
dh) Generate Diffie Hellman parameters.
CA) Create new Self-Signed CA certificate.
S) Create new Signed Server certificate.
q) Quit ssl-admin

Menu Item: S
Please enter certificate owner's name or ID.
Usual format is first initial-last name (jdoe) or
hostname of server which will use this certificate.
All lower case, numbers OK.
Owner []: rpiradius

File names will use wifiapname.
Please enter certificate owner's name or ID.
Usual format is first initial-last name (jdoe) or
hostname of server which will use this certificate.
All lower case, numbers OK.
Owner [rpiradius]:
Would you like to password protect the private key (y/n): y
Generating a 4096 bit RSA private key
................................................................................
.............................++
...................................++
writing new private key to 'rpiradius.key'
Enter PEM pass phrase: ThisUniqueKeyMustMatchYourEAP.confFileOtherWiseItWontWork
Verifying - Enter PEM pass phrase: ThisUniqueKeyMustMatchYourEAP.confFileOtherWiseItWontWork
-----
===> Serial Number = 19
Using configuration from /usr/local/etc/ssl-admin/openssl.conf
Enter pass phrase for /usr/local/etc/ssl-admin/active/ca.key: ThisShouldBeLongToo
Check that the request matches the signature
Signature ok
The Subject's Distinguished Name is as follows
countryName           :PRINTABLE:'US'
stateOrProvinceName   :PRINTABLE:'New Mexico'
localityName          :PRINTABLE:'Albuquerque'
organizationName      :PRINTABLE:'Lead Street Security'
commonName            :PRINTABLE:'rpiradius'
emailAddress          :IA5STRING:'webmaster@epijunkie.com'
Certificate is to be certified until Dec 27 23:08:26 2023 GMT (3650 days)

Write out database with 1 new entries
Data Base Updated
=========> Moving certificates and keys to /usr/local/etc/ssl-admin/active for production.
Can I move signing request (rpiradius.csr) to the csr directory for archiving?
(y/n): y
===> rpiradius.csr moved.
Next delete all the files in /etc/raddb/certs back on the rPi:
# cd /etc/raddb/certs
# rm *
Over on the CA machine, copy over the newly create certificates and the CA public key via scp:
remote_user@localCA$ cd /usr/local/ssl-admin/active/

remote_user@localCA$ scp rpiradius.* root@10.0.0.253:/etc/raddb/certs/

remote_user@localCA$ scp ca.crt root@10.0.0.253:/etc/raddb/certs/
Create the DH key by executing the following on the rPi:
# cd /etc/raddb/certs
# openssl dhparam -outform PEM -out dhparam.pem 4096
Generating DH parameters, 4096 bit long safe prime, generator 2
This is going to take a long time
..........................................+......................................................................................................................................+.........................................................................................................................................................................+......................
<Lines Pruned>
......................................................................+.........................................+.....................................+.................................................................................................................................................................................................................................+........................................................................................................................+.+...........................................................................................................................++*++*
Generating a 4096 DH key on a Raspberry Pi does take an exceptionally long time (1272m50.834s or 21 hours when I ran the command through time.) I suppose you could generate a new one on another machine with the faster processor and transfer the key afterwards. If you do run it on the rPi, I would suggest using screen to do at least this part of the installation, if not generally use this incredibly useful tool.
Configure FreeRADIUS3
As stated above, some of the configuration files have different options than the version 2.x of FreeRADIUS; as well as a different structure in /etc/raddb/ folder.
First lets edit the /etc/raddb/radiusd.conf file.
prefix = /usr
exec_prefix = ${prefix}
sysconfdir = /etc
localstatedir = /var
sbindir = /usr/bin
logdir = ${localstatedir}/log/radius
raddbdir = ${sysconfdir}/raddb
radacctdir = ${logdir}/radacct
name = radiusd
confdir = ${raddbdir}
modconfdir = ${confdir}/mods-config
certdir = ${confdir}/certs
cadir = ${confdir}/certs
run_dir = ${localstatedir}/run/${name}
db_dir = ${raddbdir}
libdir = /usr/lib/freeradius
pidfile = ${run_dir}/${name}.pid
max_request_time = 30
cleanup_delay = 5
#max_requests: This should be 256 multiplied by the number of clients.
max_requests = 1024
hostname_lookups = no
listen {
type = auth
ipaddr = 10.0.0.253
port = 0
}

log {
destination = files
colourise = yes
file = ${logdir}/radius.log
syslog_facility = daemon
stripped_names = no
auth = yes
auth_badpass = no
auth_goodpass = no
}

checkrad = ${sbindir}/checkrad

security {
user = radiusd
group = radiusd
allow_core_dumps = no
max_attributes = 200
reject_delay = 1
status_server = no
}

proxy_requests = no
$INCLUDE clients.conf

thread pool {
start_servers = 5
max_servers = 32
min_spare_servers = 3
max_spare_servers = 10
max_requests_per_server = 0
auto_limit_acct = no
}

modules {
$INCLUDE mods-enabled/
}

instantiate { }

policy {
$INCLUDE policy.d/
}

$INCLUDE sites-enabled/
Next, edit the /etc/raddb/clients.conf file. This file tells the daemon which APs or Routers can connect to the server and utilize the RADIUS service. Even though it’s named clients.conf it refers to the Authenticator in the 802.1X process (not to be confused with Authentication Server which is what we are currently configuring in this guide.)
client rpiradius {
ipaddr = 10.0.0.2
proto = *
secret = MakeThisUniqueRandomStringLongAsItWillNeverBeNeededToTypedIn.IfUsingDD-WRTTheUndocumentedMaxLengthIs79Characters
require_message_authenticator = yes
nas_type = other

limit {
max_connections = 16
lifetime = 0
idle_timeout = 30
}
}
Next, the modules will be configured and the unnecessary modules disabled. We can disable the modules by deleting the symbolic links in the /etc/raddb/mods-enabled/ directory.
# cd /etc/raddb/mods-enabled/
# rm chap ntlm_auth unix digest pap mschap passwd
Next edit the /etc/raddb/mods-enabled/eap file. Below is configuration file to allow only EAP-TLS authentication with high ciphers and as such is heavily pruned. This is an example of where some of the configuration syntax has changed.
eap {
default_eap_type = tls
timer_expire = 60
ignore_unknown_eap_types = yes
cisco_accounting_username_bug = no
max_sessions = 4096

tls-config tls-common {
private_key_password = ThisUniqueKeyMustMatchYourEAP.confFileOtherWiseItWontWork
private_key_file = ${certdir}/rpiradius.key
certificate_file = ${certdir}/rpiradius.crt
ca_file = ${cadir}/ca.crt
dh_file = ${certdir}/dhparam.pem
random_file = /dev/urandom
# check_crl = yes
ca_path = ${cadir}
cipher_list = "HIGH"

cache {
enable = yes
lifetime = 24 # hours
max_entries = 255
persist_dir = "/var/tmp/radiusd/tlscache"
}

verify {
tmpdir = /var/tmp/radiusd
client = "/usr/bin/openssl verify -CAfile /etc/raddb/certs/ca.crt %{TLS-Client-Cert-Filename}"
}
}
}

tls {
tls = tls-common
}
}
These commands setup the individual AP configurations/settings/profiles.
# cd /etc/raddb/sites-available/
# cp example rpiradius
# cd /etc/raddb/sites-enabled
# rm *
# ln -s ../sites-available/rpiradius ./rpiradius
Now to edit the /etc/raddb/sites-available/rpiradius file.
authorize {

preprocess
auth_log
eap {
ok = return
}

expiration
logintime
}

authenticate {
eap
}

preacct {
preprocess

acct_unique
suffix
files
}

session {
radutmp
}

post-auth {
exec
Post-Auth-Type REJECT {
attr_filter.access_reject
eap
}
}
Cleaning up the permissions and files
The folders /tmp/radiusd and /tmp/radiusd/tlscache will need to be created. This is where attempting Supplicant certificates will be temporarily stored during authentication and also cached for quick authentication, respectively. Quick authentication is helpful for time sensitive applications such as VoIP or teleconferences. Then we’ll fix the permissions to only allow the user radiusd to access the configuration files and certificates.
# mkdir /tmp/radiusd
# mkdir /tmp/radiusd/tlscache
# chown -R radiusd:radiusd /tmp/radiusd
# chmod -R 700 /tmp/radiusd
# chown -R radiusd:radiusd /etc/raddb/
Now to start the freeradius daemon in debug mode to check for errors
# radiusd -X
radiusd: FreeRADIUS Version 3.0.0, for host armv6l-unknown-linux-gnu, built on Nov 2 2013 at 10:59:45
Copyright (C) 1999-2013 The FreeRADIUS server project and contributors.
There is NO warranty; not even for MERCHANTABILITY or FITNESS FOR A
PARTICULAR PURPOSE.
You may redistribute copies of FreeRADIUS under the terms of the
GNU General Public License.
For more information about these matters, see the file named COPYRIGHT.
Starting - reading configuration files ...
including dictionary file /etc/raddb/dictionary
including configuration file /etc/raddb/radiusd.conf
including configuration file /etc/raddb/clients.conf
including files in directory /etc/raddb/mods-enabled/
including configuration file /etc/raddb/mods-enabled/preprocess
including configuration file /etc/raddb/mods-enabled/attr_filter
including configuration file /etc/raddb/mods-enabled/detail.log
including configuration file /etc/raddb/mods-enabled/dhcp
including configuration file /etc/raddb/mods-enabled/eap
including configuration file /etc/raddb/mods-enabled/radutmp
including configuration file /etc/raddb/mods-enabled/files
including configuration file /etc/raddb/mods-enabled/always
including configuration file /etc/raddb/mods-enabled/detail
including configuration file /etc/raddb/mods-enabled/cache_eap
including configuration file /etc/raddb/mods-enabled/expr
including configuration file /etc/raddb/mods-enabled/utf8
including configuration file /etc/raddb/mods-enabled/dynamic_clients
including configuration file /etc/raddb/mods-enabled/sradutmp
including configuration file /etc/raddb/mods-enabled/exec
including configuration file /etc/raddb/mods-enabled/echo
including configuration file /etc/raddb/mods-enabled/logintime
including configuration file /etc/raddb/mods-enabled/soh
including configuration file /etc/raddb/mods-enabled/expiration
including configuration file /etc/raddb/mods-enabled/replicate
including configuration file /etc/raddb/mods-enabled/realm
including configuration file /etc/raddb/mods-enabled/linelog
including files in directory /etc/raddb/policy.d/
including configuration file /etc/raddb/policy.d/dhcp
including configuration file /etc/raddb/policy.d/operator-name
including configuration file /etc/raddb/policy.d/eap
including configuration file /etc/raddb/policy.d/filter
including configuration file /etc/raddb/policy.d/cui
including configuration file /etc/raddb/policy.d/control
including configuration file /etc/raddb/policy.d/accounting
including configuration file /etc/raddb/policy.d/canonicalization
including files in directory /etc/raddb/sites-enabled/
including configuration file /etc/raddb/sites-enabled/rpiradius
main {
security {
user = "radiusd"
group = "radiusd"
allow_core_dumps = no
}
}
main {
name = "radiusd"
prefix = "/usr"
localstatedir = "/var"
sbindir = "/usr/bin"
logdir = "/var/log/radius"
run_dir = "/var/run/radiusd"
libdir = "/usr/lib/freeradius"
radacctdir = "/var/log/radius/radacct"
hostname_lookups = no
max_request_time = 30
cleanup_delay = 5
max_requests = 1024
pidfile = "/var/run/radiusd/radiusd.pid"
checkrad = "/usr/bin/checkrad"
debug_level = 0
proxy_requests = no
log {
stripped_names = no
auth = yes
auth_badpass = no
auth_goodpass = no
colourise = yes
}
security {
max_attributes = 200
reject_delay = 1
status_server = yes
}
}
radiusd: #### Loading Realms and Home Servers ####
radiusd: #### Loading Clients ####
client rpiradius {
ipaddr = 10.0.0.1
require_message_authenticator = yes
secret = "MakeThisUniqueRandomStringLongAsItWillNeverBeNeededToTypedIn.IfUsingDD-WRTTheUndocumentedMaxLengthIs79Characters"
nas_type = "other"
proto = "*"
limit {
max_connections = 16
lifetime = 0
idle_timeout = 30
}
}
radiusd: #### Instantiating modules ####
instantiate {
}
modules {
# Loaded module rlm_preprocess
# Instantiating module "preprocess" from file /etc/raddb/mods-enabled/preprocess
preprocess {
huntgroups = "/etc/raddb/mods-config/preprocess/huntgroups"
hints = "/etc/raddb/mods-config/preprocess/hints"
with_ascend_hack = no
ascend_channels_per_line = 23
with_ntdomain_hack = no
with_specialix_jetstream_hack = no
with_cisco_vsa_hack = no
with_alvarion_vsa_hack = no
}
reading pairlist file /etc/raddb/mods-config/preprocess/huntgroups
reading pairlist file /etc/raddb/mods-config/preprocess/hints
# Loaded module rlm_attr_filter
# Instantiating module "attr_filter.post-proxy" from file /etc/raddb/mods-enabled/attr_filter
attr_filter attr_filter.post-proxy {
filename = "/etc/raddb/mods-config/attr_filter/post-proxy"
key = "%{Realm}"
relaxed = no
}
reading pairlist file /etc/raddb/mods-config/attr_filter/post-proxy
# Instantiating module "attr_filter.pre-proxy" from file /etc/raddb/mods-enabled/attr_filter
attr_filter attr_filter.pre-proxy {
filename = "/etc/raddb/mods-config/attr_filter/pre-proxy"
key = "%{Realm}"
relaxed = no
}
reading pairlist file /etc/raddb/mods-config/attr_filter/pre-proxy
# Instantiating module "attr_filter.access_reject" from file /etc/raddb/mods-enabled/attr_filter
attr_filter attr_filter.access_reject {
filename = "/etc/raddb/mods-config/attr_filter/access_reject"
key = "%{User-Name}"
relaxed = no
}
reading pairlist file /etc/raddb/mods-config/attr_filter/access_reject
# Instantiating module "attr_filter.access_challenge" from file /etc/raddb/mods-enabled/attr_filter
attr_filter attr_filter.access_challenge {
filename = "/etc/raddb/mods-config/attr_filter/access_challenge"
key = "%{User-Name}"
relaxed = no
}
reading pairlist file /etc/raddb/mods-config/attr_filter/access_challenge
# Instantiating module "attr_filter.accounting_response" from file /etc/raddb/mods-enabled/attr_filter
attr_filter attr_filter.accounting_response {
filename = "/etc/raddb/mods-config/attr_filter/accounting_response"
key = "%{User-Name}"
relaxed = no
}
reading pairlist file /etc/raddb/mods-config/attr_filter/accounting_response
# Loaded module rlm_detail
# Instantiating module "auth_log" from file /etc/raddb/mods-enabled/detail.log
detail auth_log {
filename = "/var/log/radius/radacct/%{%{Packet-Src-IP-Address}:-%{Packet-Src-IPv6-Address}}/auth-detail-%Y%m%d"
header = "%t"
permissions = 384
dir_permissions = 493
locking = no
log_packet_header = no
}
# Instantiating module "reply_log" from file /etc/raddb/mods-enabled/detail.log
detail reply_log {
filename = "/var/log/radius/radacct/%{%{Packet-Src-IP-Address}:-%{Packet-Src-IPv6-Address}}/reply-detail-%Y%m%d"
header = "%t"
permissions = 384
dir_permissions = 493
locking = no
log_packet_header = no
}
# Instantiating module "pre_proxy_log" from file /etc/raddb/mods-enabled/detail.log
detail pre_proxy_log {
filename = "/var/log/radius/radacct/%{%{Packet-Src-IP-Address}:-%{Packet-Src-IPv6-Address}}/pre-proxy-detail-%Y%m%d"
header = "%t"
permissions = 384
dir_permissions = 493
locking = no
log_packet_header = no
}
# Instantiating module "post_proxy_log" from file /etc/raddb/mods-enabled/detail.log
detail post_proxy_log {
filename = "/var/log/radius/radacct/%{%{Packet-Src-IP-Address}:-%{Packet-Src-IPv6-Address}}/post-proxy-detail-%Y%m%d"
header = "%t"
permissions = 384
dir_permissions = 493
locking = no
log_packet_header = no
}
# Loaded module rlm_dhcp
# Instantiating module "dhcp" from file /etc/raddb/mods-enabled/dhcp
# Loaded module rlm_eap
# Instantiating module "eap" from file /etc/raddb/mods-enabled/eap
eap {
default_eap_type = "tls"
timer_expire = 60
ignore_unknown_eap_types = no
mod_accounting_username_bug = no
max_sessions = 4096
}
# Linked to sub-module rlm_eap_tls
tls {
tls = "tls-common"
}
tls-config tls-common {
rsa_key_exchange = no
dh_key_exchange = yes
rsa_key_length = 512
dh_key_length = 512
verify_depth = 0
ca_path = "/etc/raddb/certs"
pem_file_type = yes
private_key_file = "/etc/raddb/certs/rpiradius.key"
certificate_file = "/etc/raddb/certs/rpiradius.crt"
ca_file = "/etc/raddb/certs/ca.crt"
private_key_password="ThisUniqueKeyMustMatchYourEAP.confFileOtherWiseItWontWork"
dh_file = "/etc/raddb/certs/dhparam.pem"
fragment_size = 1024
include_length = yes
check_crl = no
cipher_list = "HIGH"
cache {
enable = yes
lifetime = 24
max_entries = 255
persist_dir = "/tmp/radiusd/tlscache"
}
verify {
tmpdir = "/tmp/radiusd"
}
ocsp {
enable = no
override_cert_url = no
use_nonce = yes
timeout = 0
softfail = yes
}
}
# Loaded module rlm_radutmp
# Instantiating module "radutmp" from file /etc/raddb/mods-enabled/radutmp
radutmp {
filename = "/var/log/radius/radutmp"
username = "%{User-Name}"
case_sensitive = yes
check_with_nas = yes
permissions = 384
caller_id = yes
}
# Loaded module rlm_files
# Instantiating module "files" from file /etc/raddb/mods-enabled/files
files {
filename = "/etc/raddb/mods-config/files/authorize"
usersfile = "/etc/raddb/mods-config/files/authorize"
acctusersfile = "/etc/raddb/mods-config/files/accounting"
preproxy_usersfile = "/etc/raddb/mods-config/files/pre-proxy"
compat = "no"
}
reading pairlist file /etc/raddb/mods-config/files/authorize
reading pairlist file /etc/raddb/mods-config/files/authorize
reading pairlist file /etc/raddb/mods-config/files/accounting
reading pairlist file /etc/raddb/mods-config/files/pre-proxy
# Loaded module rlm_always
# Instantiating module "fail" from file /etc/raddb/mods-enabled/always
always fail {
rcode = "fail"
simulcount = 0
mpp = no
}
# Instantiating module "reject" from file /etc/raddb/mods-enabled/always
always reject {
rcode = "reject"
simulcount = 0
mpp = no
}
# Instantiating module "noop" from file /etc/raddb/mods-enabled/always
always noop {
rcode = "noop"
simulcount = 0
mpp = no
}
# Instantiating module "handled" from file /etc/raddb/mods-enabled/always
always handled {
rcode = "handled"
simulcount = 0
mpp = no
}
# Instantiating module "updated" from file /etc/raddb/mods-enabled/always
always updated {
rcode = "updated"
simulcount = 0
mpp = no
}
# Instantiating module "notfound" from file /etc/raddb/mods-enabled/always
always notfound {
rcode = "notfound"
simulcount = 0
mpp = no
}
# Instantiating module "ok" from file /etc/raddb/mods-enabled/always
always ok {
rcode = "ok"
simulcount = 0
mpp = no
}
# Instantiating module "detail" from file /etc/raddb/mods-enabled/detail
detail {
filename = "/var/log/radius/radacct/%{%{Packet-Src-IP-Address}:-%{Packet-Src-IPv6-Address}}/detail-%Y%m%d"
header = "%t"
permissions = 384
dir_permissions = 493
locking = no
log_packet_header = no
}
# Loaded module rlm_cache
# Instantiating module "cache_eap" from file /etc/raddb/mods-enabled/cache_eap
cache cache_eap {
key = "%{%{control:State}:-%{%{reply:State}:-%{State}}}"
ttl = 15
max_entries = 16384
epoch = 0
add_stats = no
}
# Loaded module rlm_expr
# Instantiating module "expr" from file /etc/raddb/mods-enabled/expr
expr {
safe_characters = "@abcdefghijklmnopqrstuvwxyzABCDEFGHIJKLMNOPQRSTUVWXYZ0123456789.-_: /"
}
# Loaded module rlm_utf8
# Instantiating module "utf8" from file /etc/raddb/mods-enabled/utf8
# Loaded module rlm_dynamic_clients
# Instantiating module "dynamic_clients" from file /etc/raddb/mods-enabled/dynamic_clients
# Instantiating module "sradutmp" from file /etc/raddb/mods-enabled/sradutmp
radutmp sradutmp {
filename = "/var/log/radius/sradutmp"
username = "%{User-Name}"
case_sensitive = yes
check_with_nas = yes
permissions = 420
caller_id = no
}
# Loaded module rlm_exec
# Instantiating module "exec" from file /etc/raddb/mods-enabled/exec
exec {
wait = no
input_pairs = "request"
shell_escape = yes
}
# Instantiating module "echo" from file /etc/raddb/mods-enabled/echo
exec echo {
wait = yes
program = "/bin/echo %{User-Name}"
input_pairs = "request"
output_pairs = "reply"
shell_escape = yes
}
# Loaded module rlm_logintime
# Instantiating module "logintime" from file /etc/raddb/mods-enabled/logintime
logintime {
minimum_timeout = 60
}
# Loaded module rlm_soh
# Instantiating module "soh" from file /etc/raddb/mods-enabled/soh
soh {
dhcp = yes
}
# Loaded module rlm_expiration
# Instantiating module "expiration" from file /etc/raddb/mods-enabled/expiration
# Loaded module rlm_replicate
# Instantiating module "replicate" from file /etc/raddb/mods-enabled/replicate
# Loaded module rlm_realm
# Instantiating module "IPASS" from file /etc/raddb/mods-enabled/realm
realm IPASS {
format = "prefix"
delimiter = "/"
ignore_default = no
ignore_null = no
}
# Instantiating module "suffix" from file /etc/raddb/mods-enabled/realm
realm suffix {
format = "suffix"
delimiter = "@"
ignore_default = no
ignore_null = no
}
# Instantiating module "realmpercent" from file /etc/raddb/mods-enabled/realm
realm realmpercent {
format = "suffix"
delimiter = "%"
ignore_default = no
ignore_null = no
}
# Instantiating module "ntdomain" from file /etc/raddb/mods-enabled/realm
realm ntdomain {
format = "prefix"
delimiter = "\"
ignore_default = no
ignore_null = no
}
# Loaded module rlm_linelog
# Instantiating module "linelog" from file /etc/raddb/mods-enabled/linelog
linelog {
filename = "/var/log/radius/linelog"
permissions = 384
format = "This is a log message for %{User-Name}"
reference = "%{%{Packet-Type}:-format}"
}
} # modules
radiusd: #### Loading Virtual Servers ####
server { # from file /etc/raddb/radiusd.conf
# Loading authenticate {...}
# Loading authorize {...}
# Loading preacct {...}
# Loading virtual module acct_unique
# Loading session {...}
# Loading post-auth {...}
} # server
radiusd: #### Opening IP addresses and Ports ####
listen {
type = "auth"
ipaddr = 10.0.0.253
port = 0
}
Listening on auth address 10.0.0.253 port 1812
Ready to process requests.
This last line is the most important. If you see this, you have a running radius authentication server. At this point, all the configuration files are probably correct.
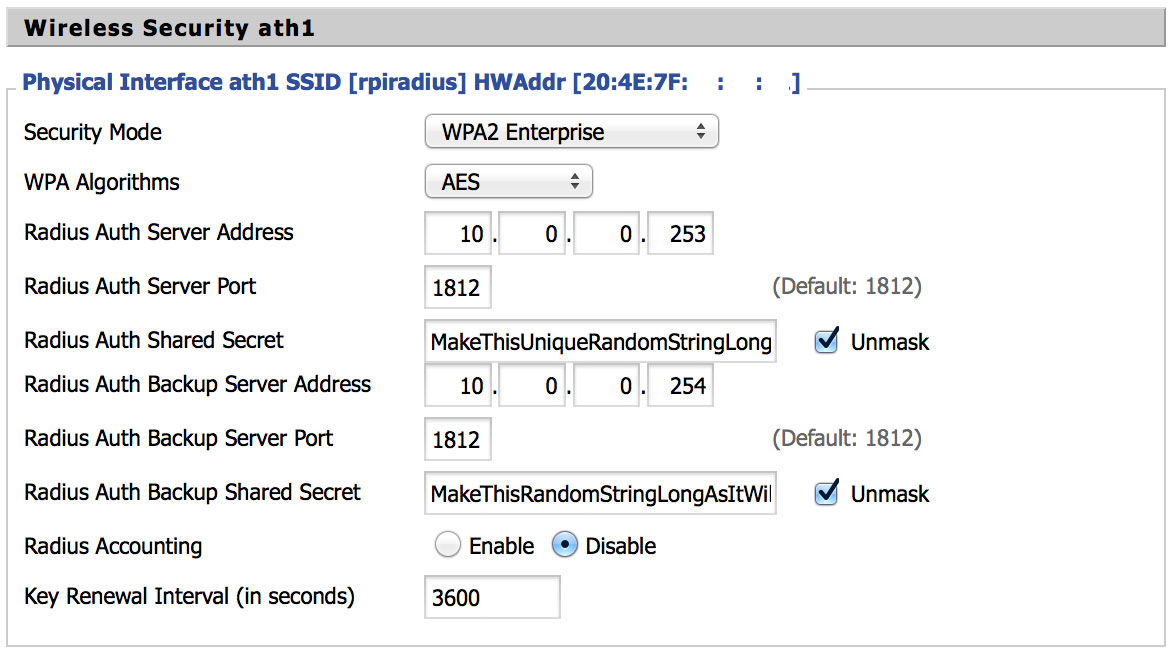
Configuring the Access Point
I’d suggest using a router/AP capable of running DD-WRT. It’s a custom firmware that runs on many home/SOHO class routers and AP devices, your’s may be supported. Below is a region screenshot of the Wireless > Wireless Security section for this tutorial’s wireless setup.
DD-WRT isn’t required but is known to work well with 802.1X wireless access. My stock Netgear firmware on my AP allowed for this to work as well but I’m typically not one to keep things stock.
An advantage of using DD-WRT is possible to configure a backup RADIUS server; which has been done. Using the previous created RADIUS install from the last guide as the secondary and this install as the primary.
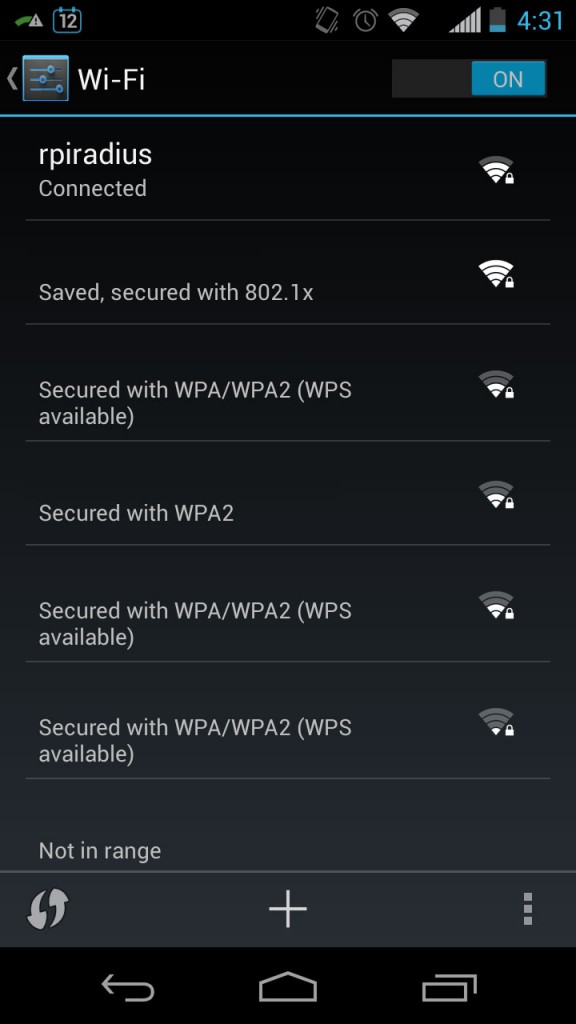
Now try to connect a client.
<Lines Pruned>
(20) eap_tls : Received TLS ACK
(20) eap_tls : Received TLS ACK
(20) eap_tls : ACK handshake is finished
(20) eap_tls : eaptls_verify returned 3
(20) eap_tls : eaptls_process returned 3
(20) eap_tls : Saving session dce546c87102e95ab9b0bdffebd0af2e1681aa7070de505b5c9e10289c7652d5 vps 0x108c120 in the cache
(20) eap : Freeing handler
(20) [eap] = ok
(20) } # authenticate = ok
(20) Login OK: [tutandroid] (from client rpiradius port 2 cli 60-BE-B5-00-00-00)
(20) # Executing section post-auth from file /etc/raddb/sites-enabled/rpiradius
(20) post-auth {
(20) [exec] = noop
(20) } # post-auth = noop
Sending Access-Accept of id 76 from 10.0.0.253 port 1812 to 10.0.0.2 port 56318
MS-MPPE-Recv-Key = 0xda100e3006a8710287102d525f0a7b63a0b4322f8d946ecb0e95eb01965db856
MS-MPPE-Send-Key = 0xbede6a62d9ca1d49e0b8f5672e8dfae817d505da050feb658b016c2e20757ec9
EAP-Message = 0x037a0004
Message-Authenticator = 0x00000000000000000000000000000000
User-Name = 'tutandroid'
(20) Finished request 20.
Waking up in 0.1 seconds.
Waking up in 3.5 seconds.
Ready to process requests.
At this point you can safely assume that the certificates work as does the daemon. You can can terminate the debug mode of radiusd by sending an SIGINT with Ctrl + C.
You can now start the daemon manually by using this command:
# systemctl start freeradius
To enable freeradius to start on boot by running this once:
# systemctl enable freeradius
Security Considerations
This is a near Full Disk Encryption (FDE) setup which means not everything is encrypted. What’s not encrypted is the /boot partition which contains the kernel among other things. A clever person could code all sorts of malicious things with access to the unencrypted kernel. To my knowledge there are not any ways around this.
Also I’d suggest zeroing out the partition containing the unencrypted Arch Linux install. You can do this by running dd if=/dev/zero of=/dev/mmcblk0p2 bs=1M as root.
Sources
utlemming’s blog: WPA2-Enterprise: Making my Raspberry Pi earn its keep
Git – Pezz – Archlinux ARM encrypted root
Cryptsetup 1.4.0 Release Notes
Previous FreeRADIUS post – FreeBSD + Freeradius2 + EAP-TLS + ssl-admin, a WPA2 Enterprise Guide.
Thanks To
pezz for the Arch Linux FDE SD guide.
Allan Jude via the BSDNow podcast for making me aware of screen.
And lastly Ben Howard for the original idea of using a Raspberry Pi to act as a RADIUS server.